SharePoint – Site Pages trick to convert Pages to News Posts and News Posts to Pages

SharePoint – Site Pages trick to convert Pages to News Posts and News Posts to Pages

Changing the promoted state of SharePoint Pages and News Posts

I needed a solution which would make it easy for our intranet team to make changes to the Promoted State of Pages and News Posts in SharePoint.

We needed to quickly convert Pages to News Posts from the Site Pages Library, but also to change some News Posts promoted in error by intranet authors back to Pages.

In the Site Pages library, there is a Promoted State column. Depending on the value stored in this column, you can identify whether it is a site page or a news post. The relationship between the Promoted State value and page type is as follows.

 Promoted State and Page Type

        • 0            Site page
        • 1            News Post not yet published
        • 2            News Post

Once a page is created as news post, it cannot easily be demoted to a site page because the Promoted State column is read only.

Forget about creating views to show the Promoted State of a Page – doesn’t work, you cant edit the cell the promoted state is in.


Here’s how to set it up:

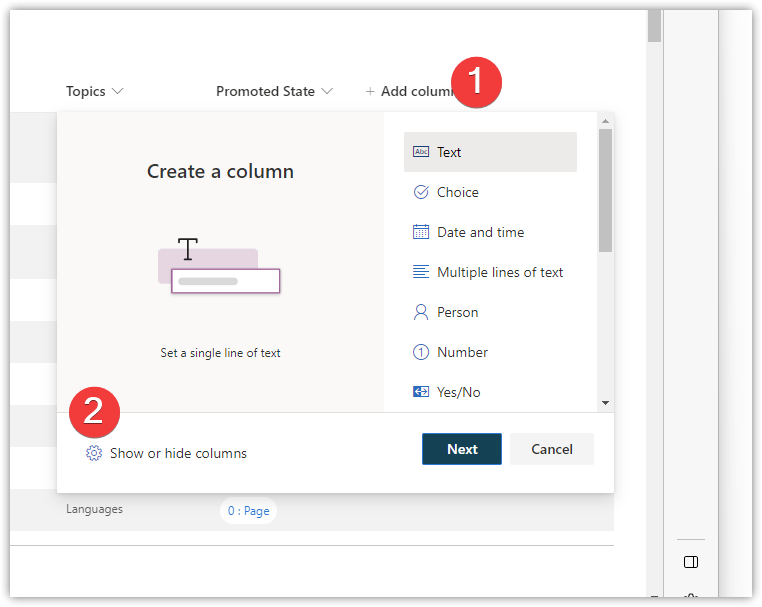
  1. In the Site Pages library view click Add column
  2. click Show or Hide columns
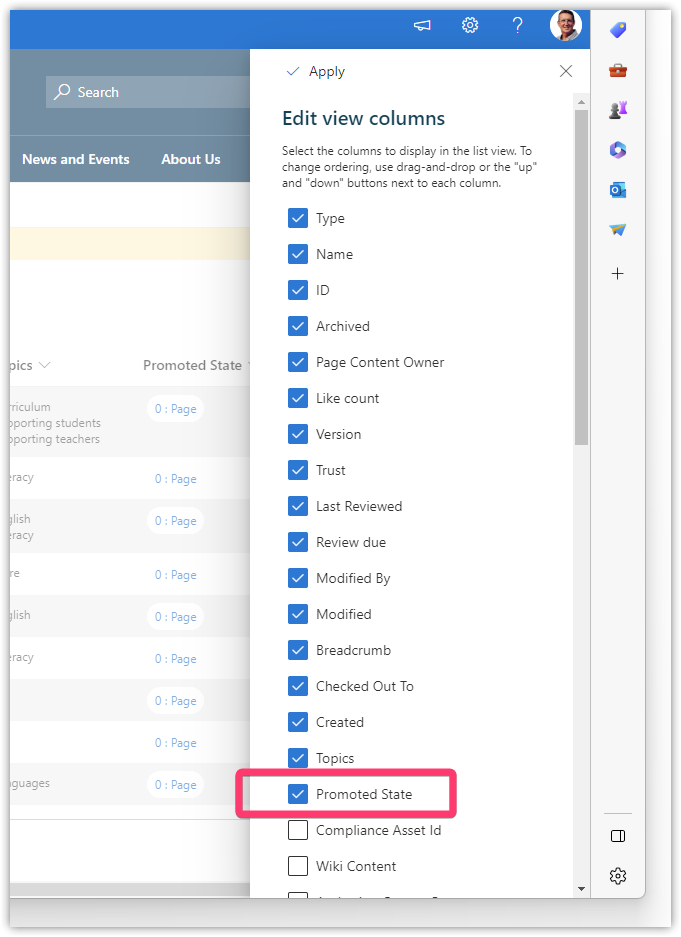
  3. choose Promoted State
  4. click Apply


Now format the Promoted State column so we can add the code to change the SharePoint News Post back to a standard SharePoint Page.

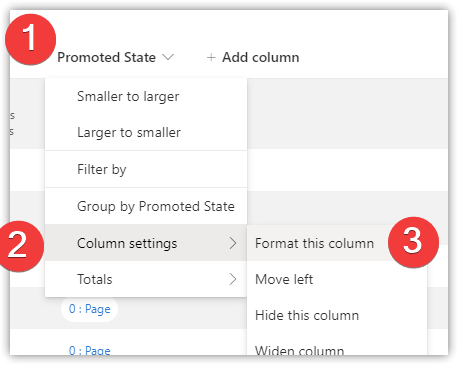
  • Hover of the heading of the Promoted State column
  • select Column Settings
  • select Format this column
  • on the formatting pane that opens select Advanced mode
Delete the default code displayed in the formatting box shown above and paste the code shown below there.

Select all the code shown below then Paste into the Advanced formatting box

{
“$schema”: “https://developer.microsoft.com/json-schemas/sp/v2/column-formatting.schema.json”,
“elmType”: “div”,
“style”: {
“flex-wrap”: “wrap”,
“display”: “flex”,
“flex-direction”: “row”
},
“children”: [
{
“elmType”: “div”,
“txtContent”: “=if(@currentField == 0 ,’0 : Page’ , if(@currentField == 1, ‘1 : News (Unpublished)’ , if(@currentField == 2 , ‘2 : News Post’,”) ) )”,
“style”: {
“box-sizing”: “border-box”,
“padding”: “4px 8px 5px 8px”,
“display”: “flex”,
“border-radius”: “16px”,
“height”: “27px”,
“align-items”: “center”,
“white-space”: “nowrap”,
“overflow”: “hidden”,
“margin”: “4px 4px 4px 4px”,
“border”: “1px solid”
},
“attributes”: {
“class”: “=if(@currentField == 0 ,’ms-fontColor-themePrimary ms-borderColor-themePrimary ms-bgColor-white’ , if(@currentField == 1, ‘ms-fontColor-themePrimary ms-borderColor-themePrimary ms-bgColor-themeLighter’ , if(@currentField == 2 , ‘ms-fontColor-white ms-borderColor-themePrimary ms-bgColor-themePrimary’,”) ) )”
}
},
{
“elmType”: “div”,
“style”: {
“font-size”: “18px”,
“cursor”: “pointer”,
“padding”: “10px”,
“border-radius”: “50%”,
“display”: “=if(@currentField == 0 , ‘none’ ,”)”
},
“attributes”: {
“iconName”: “MoreVertical”,
“class”: “ms-fontColor-themePrimary ms-bgColor-themeLighter–hover”
},
“customCardProps”: {
“openOnEvent”: “click”,
“directionalHint”: “rightCenter”,
“isBeakVisible”: true,
“formatter”: {
“elmType”: “div”,
“txtContent”: “Demote (Change to 0:Page)”,
“style”: {
“padding”: “10px 20px 10px 20px”,
“cursor”: “pointer”
},
“attributes”: {
“class”: “ms-bgColor-themeLighter–hover”
},
“customRowAction”: {
“action”: “setValue”,
“actionInput”: {
“PromotedState”: “0”
}
}
}
}
},
{
“elmType”: “div”,
“style”: {
“font-size”: “18px”,
“cursor”: “pointer”,
“padding”: “10px”,
“border-radius”: “50%”,
“display”: “=if(@currentField == 2 , ‘none’ ,”)”
},
“attributes”: {
“iconName”: “MoreVertical”,
“class”: “ms-fontColor-themePrimary ms-bgColor-themeLighter–hover”
},
“customCardProps”: {
“openOnEvent”: “click”,
“directionalHint”: “rightCenter”,
“isBeakVisible”: true,
“formatter”: {
“elmType”: “div”,
“txtContent”: “Promote (Change to 2:News Post)”,
“style”: {
“padding”: “10px 20px 10px 20px”,
“cursor”: “pointer”
},
“attributes”: {
“class”: “ms-bgColor-themeLighter–hover”
},
“customRowAction”: {
“action”: “setValue”,
“actionInput”: {
“PromotedState”: “2”
}
}
}
}
}
]
}

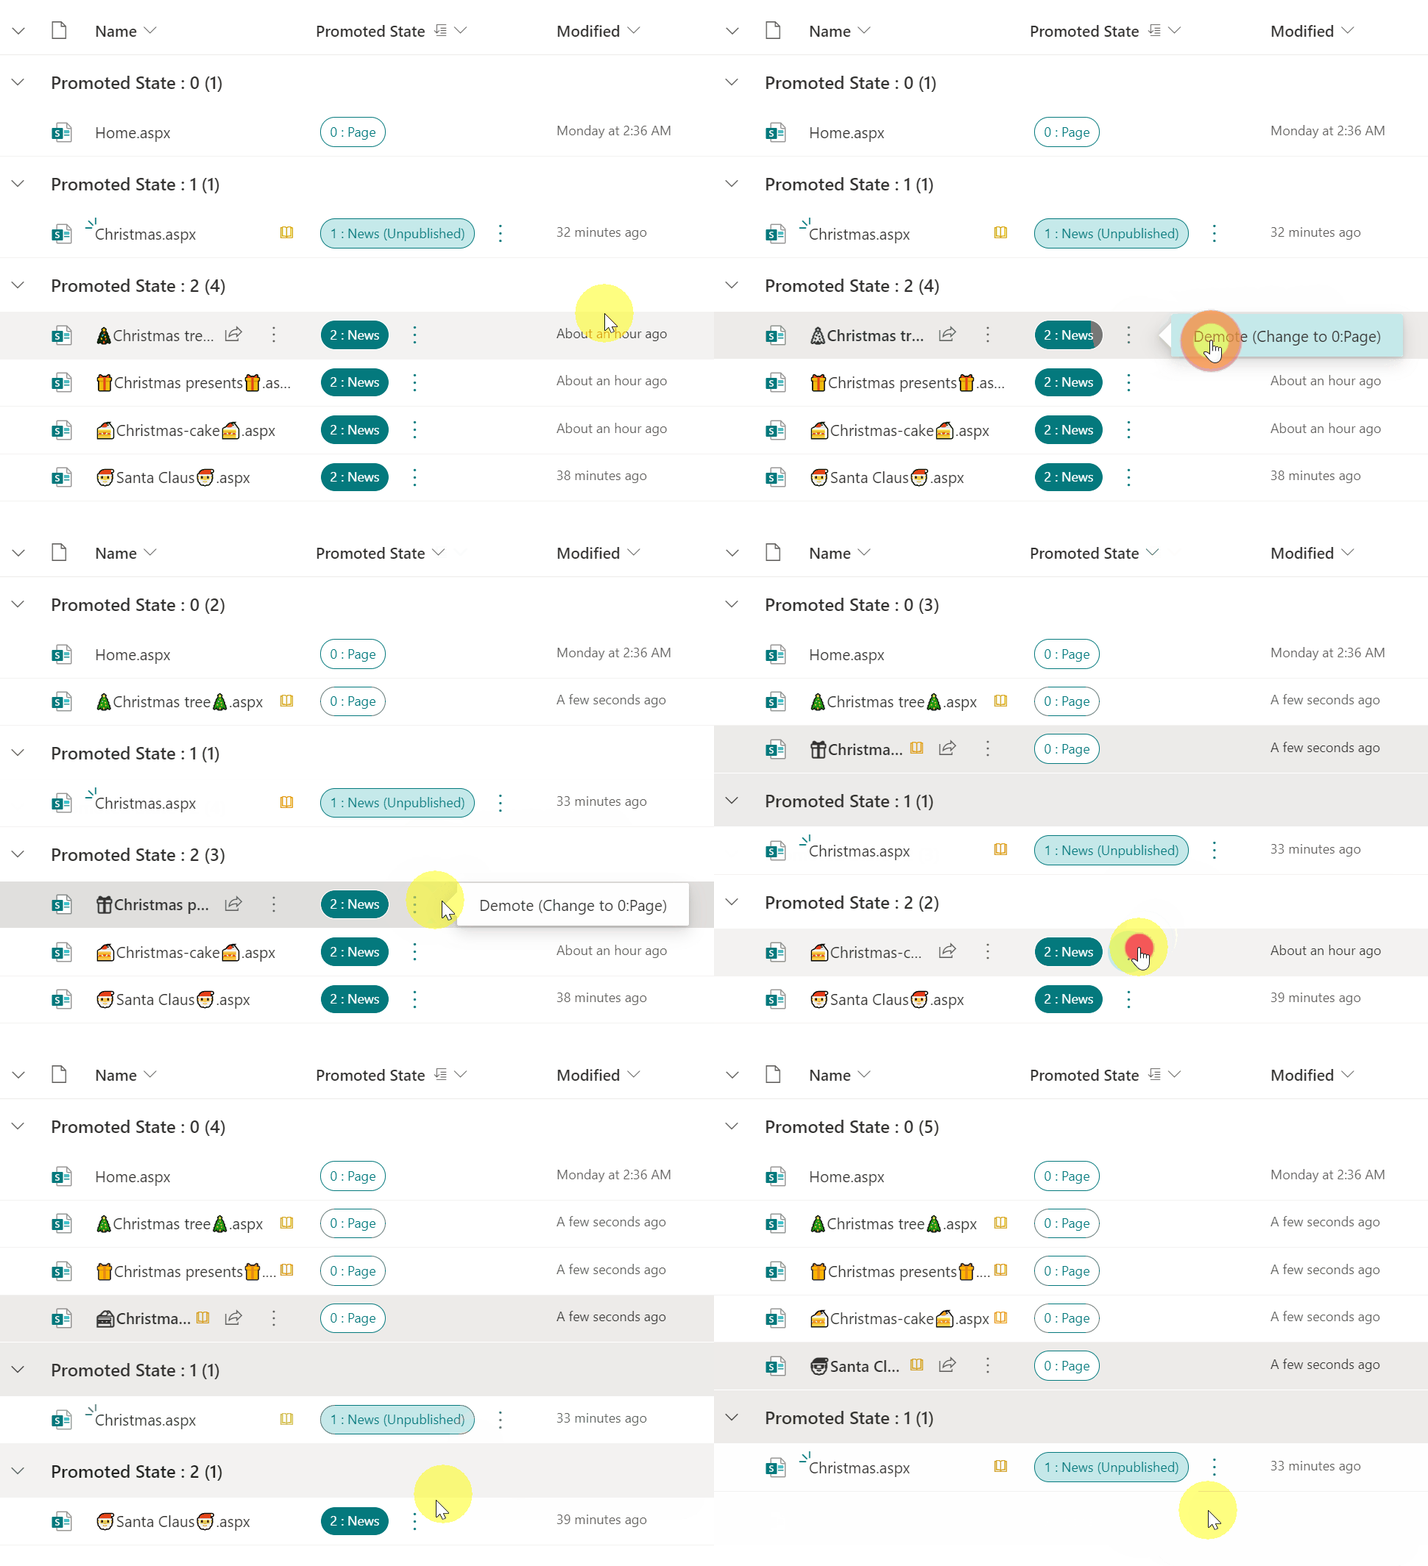
Now that you have the Site Pages list view showing the Promoted State column you can see the options available to convert Pages and News Posts.

Simply click the more options dots next to the Promoted State and choose to Demote or Promote the Page or News Post

Last step – Remember to Republish your page!

How to Fix the “List” Issue in PowerBI when Using SharePoint People Picker Fields

How to Fix the “List” Issue in PowerBI when Using SharePoint People Picker Fields

What is this List and Record issue you get when connecting a SharePoint list to Power BI?

We have connected our company intranet (SharePoint Modern) to Power BI to gather data and present it using a number of reports. Reports are used to support our management of Content, our Intranet Authors and our Page Owners. Through Power BI we can quickly drill into live data from our SharePoint intranet Site Pages libraries and Document libraries.

Power BI allows us to connect to these libraries, but when we do – the People Picker field just returns the word “List” (or maybe you see Record), rather than the person’s name.

Columns such as: Modified By, Created By, Content Owner – only returned the word “List” when we wanted to see the staff member’s name.  Surprisingly, it was difficult to find a solution – hence this post……..

The steps below will help you to expand and choose different items when you see the List/Record content from a SharePoint column cell being displayed in a Power BI query table. For example we also see it when in a choice column, and Expand to New Rows, then choose Label to display the content from the SharePoint list.


How to resolve People Picker/Person or group columns not displaying the username in Power BI

Step 1: Connect Your SharePoint List to PowerBI

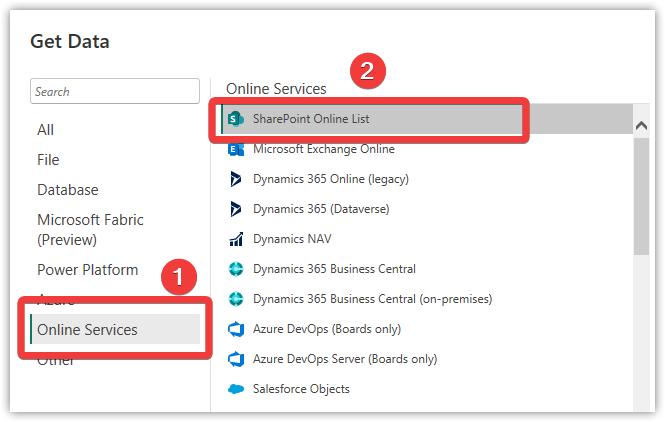
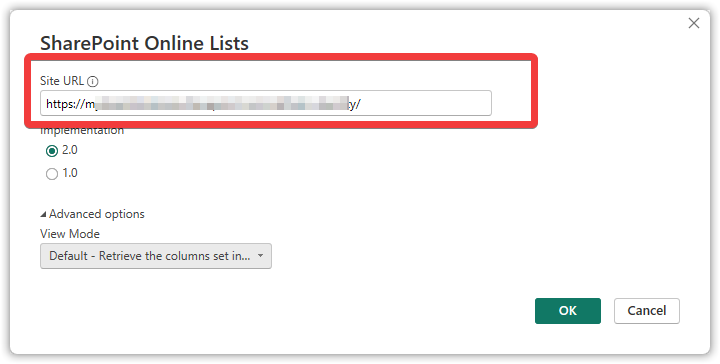
Open PowerBI and click on Home > Get Data > More > Online Services > SharePoint Online List.


STep 1 connect to sharepoint online list for power bi site pages library


Paste the URL of your SharePoint site, and click OK.


Step 2 - connect to SharePoint site


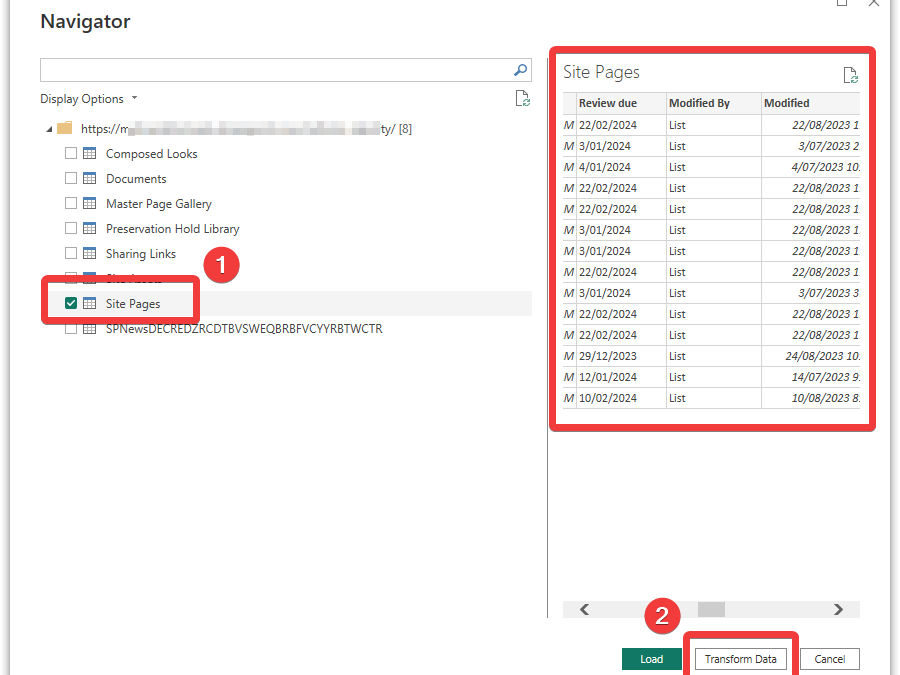
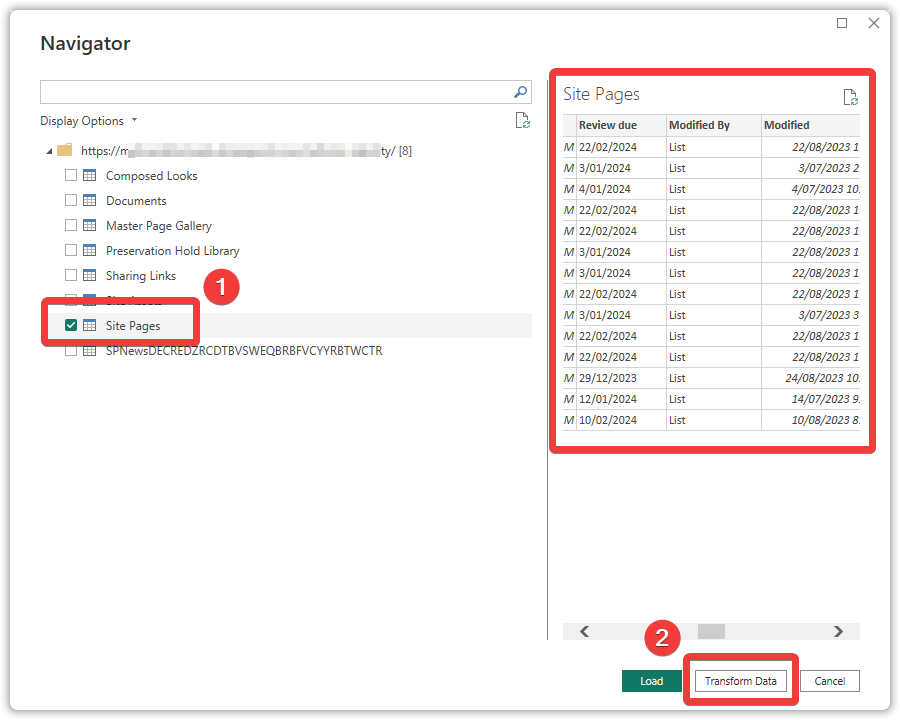
The available resources on your SharePoint site will be listed – choose Site Pages. Notice in the preview window if you slide across to a Person or Group column, that the field displays “List” not the persons name. This is what we want to change.

Click Transform Data


Step 3 - connect to SharePoint site pages library transform data


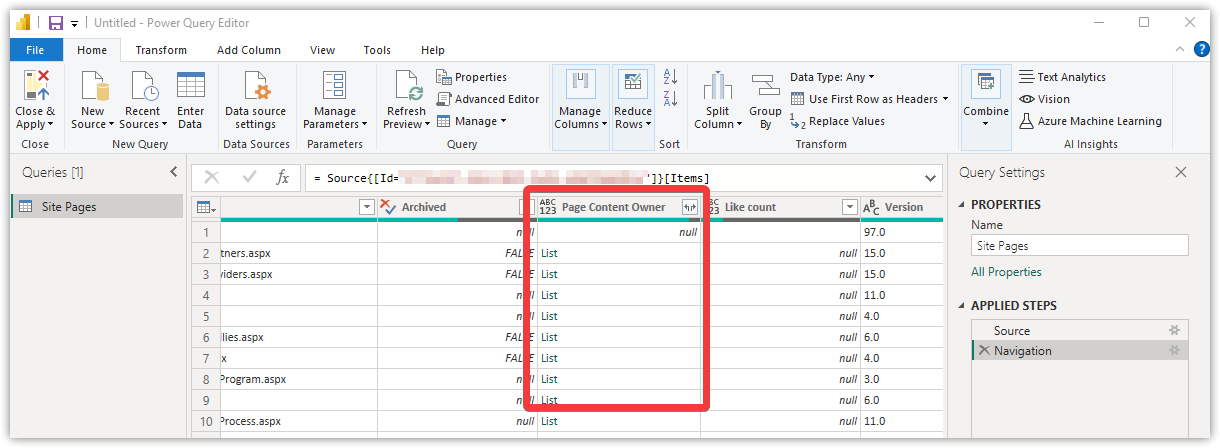
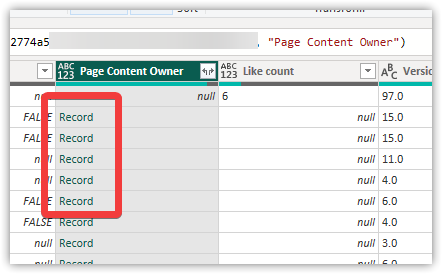
Scroll across to the Column where the Persons name should be displayed – notice it has the word List in every field instead of the user name from the SharePoint list.

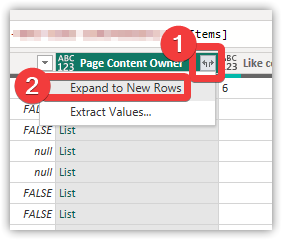
Click the icon showing the two arrows and select Expand to New Rows.


expand new rows - Problem solved - power bi table shows list not persons name

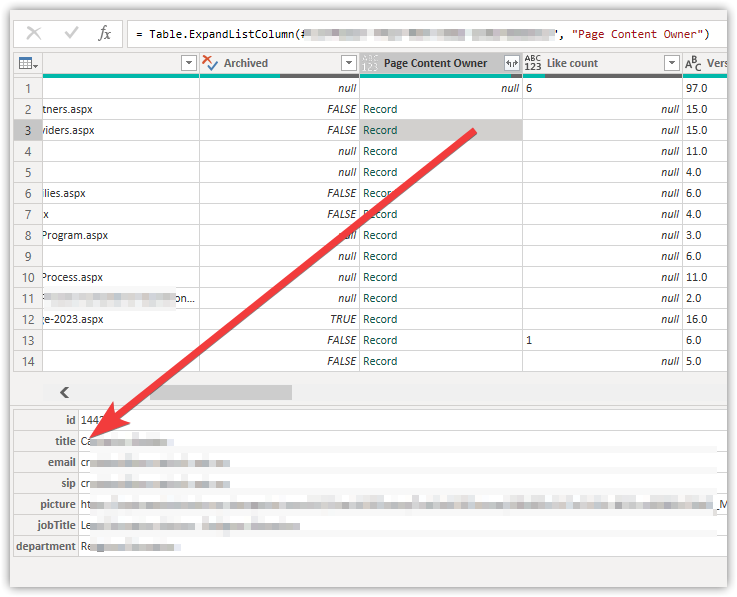
The column will change and now show the word Record in each cell instead of the word List. Now we can choose from the List of details available to show the title of our person (or whatever other field we want displayed). To view the contents of the list click on some space next to the word Record and a preview will be shown.

Record is displayed - power bi table shows list not persons name

The column will change and now show the word Record in each cell instead of the word List. Now we can choose from the List of details available to show the title of our person (or whatever other field we want displayed). To view the contents of the list click on some space next to the word Record and a preview will be shown.

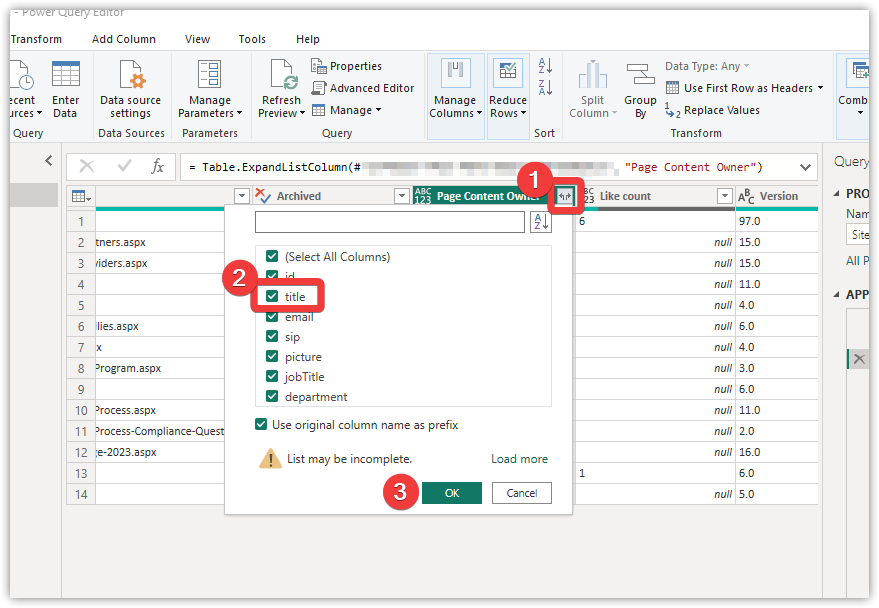
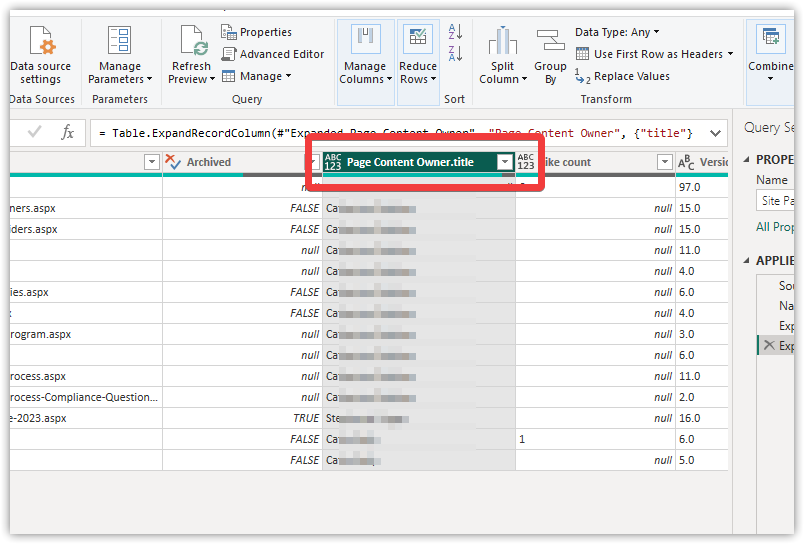
To select the field we want click again on the icon with the two arrows and make sure only the title (for our demo) is displayed and click OK.

person column Problem solved - power bi table shows list not persons name

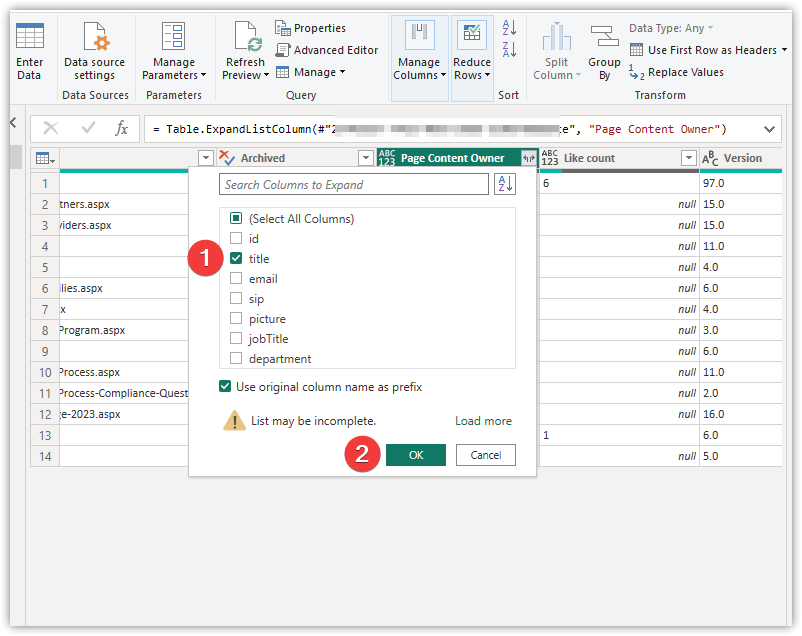
To select the field we want displayed in our column, click again on the icon with the two arrows and make sure only the title (for our demo) is displayed and click OK.

choose title - power bi table shows list not persons name

Now to tidy up the column we can rename it by double clicking on the column heading and changing it to simply Page Content Owner.

rename column by double clicking - power bi table shows list not persons name


If that guide was helpful for you please help us by sharing it 🙂

SharePoint – Site Pages trick to convert Pages to News Posts and News Posts to Pages

SharePoint – convert a News Post back to a standard Page

Why would you need to change a SharePoint News Post back to a SharePoint Page?

In our company intranet we have times where people create Pages and then take up SharePoint’s offer to Promote their Page by making it a News Post. While this sounds good – we don’t want every page becoming a News Post and appearing in various News Feeds across different Microsoft 365 apps.

In the Site Pages library, there is a Promoted State column. Depending on the value stored in this column, you can identify whether it is a site page or a news page. The relationship between the Promoted State value and page type is as follows.

 Promoted State and Page Type

        • 0            Site page
        • 1            News page not yet published
        • 2            News page

Once a page is created as news page, it cannot easily be demoted to a site page because the Promoted State column is read only.

Forget about creating views to show the Promoted State of a Page – doesn’t work, you cant edit the cell the promoted state is in.

I had to find a way to convert a SharePoint News Post back into a SharePoint Page.  It wasn’t easy. But I managed to get some help from one of the dozens of forums I went through trying to solve this.


Here’s how to set it up:

  1. Start by creating a new view in your SharePoint Site Pages library – base it on All Items and call it All News Posts
  2. In the view click Add column
  3. click Show or Hide columns
  4. choose Promoted State
  5. click Apply


Now format the Promoted State column so we can add the code to change the SharePoint News Post back to a standard SharePoint Page.

  • Hover of the heading of the Promoted State column
  • select Column Settings
  • select Format this column
  • on the formatting pane that opens select Advanced mode
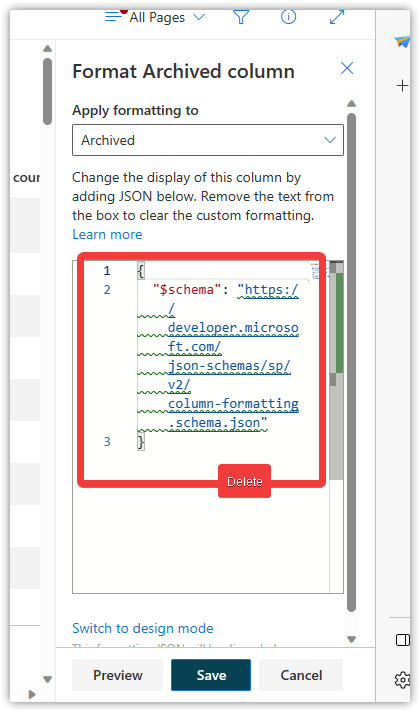
Delete the default code displayed in the formatting box shown above and paste the code shown below there.

Select all the code shown below then Paste into the Advanced formatting box

{
"$schema": "https://developer.microsoft.com/json-schemas/sp/v2/column-formatting.schema.json",
"elmType": "div",
"style": {
"flex-wrap": "wrap",
"display": "flex",
"flex-direction": "row"
},
"children": [
{
"elmType": "div",
"txtContent": "=if(@currentField == 0 ,'0 : Page' , if(@currentField == 1, '1 : News (Unpublished)' , if(@currentField == 2 , '2 : News','') ) )",
"style": {
"box-sizing": "border-box",
"padding": "4px 8px 5px 8px",
"display": "flex",
"border-radius": "16px",
"height": "27px",
"align-items": "center",
"white-space": "nowrap",
"overflow": "hidden",
"margin": "4px 4px 4px 4px",
"border": "1px solid"
},
"attributes": {
"class": "=if(@currentField == 0 ,'ms-fontColor-themePrimary ms-borderColor-themePrimary ms-bgColor-white' , if(@currentField == 1, 'ms-fontColor-themePrimary ms-borderColor-themePrimary ms-bgColor-themeLighter' , if(@currentField == 2 , 'ms-fontColor-white ms-borderColor-themePrimary ms-bgColor-themePrimary','') ) )"
}
},
{
"elmType": "div",
"style": {
"font-size": "18px",
"cursor": "pointer",
"padding": "10px",
"border-radius": "50%",
"display": "=if(@currentField == 0 , 'none' ,'')"
},
"attributes": {
"iconName": "MoreVertical",
"class": "ms-fontColor-themePrimary ms-bgColor-themeLighter--hover"
},
"customCardProps": {
"openOnEvent": "click",
"directionalHint": "rightCenter",
"isBeakVisible": true,
"formatter": {
"elmType": "div",
"txtContent": "Demote (Change to 0:Page)",
"style": {
"padding": "10px 20px 10px 20px",
"cursor": "pointer"
},
"attributes": {
"class": "ms-bgColor-themeLighter--hover"
},
"customRowAction": {
"action": "setValue",
"actionInput": {
"PromotedState": "0"
}
}
}
}
}
]
}

Now that you have a list view showing the Promoted State column filter it to show items with Promoted State of 1 or 2 so you can only see news Posts.

Simply click the more options dots next to the Promoted State and choose to Demote the Page to 0 – (Standard SharePoint Page)

Last step – Remember to Republish your page!
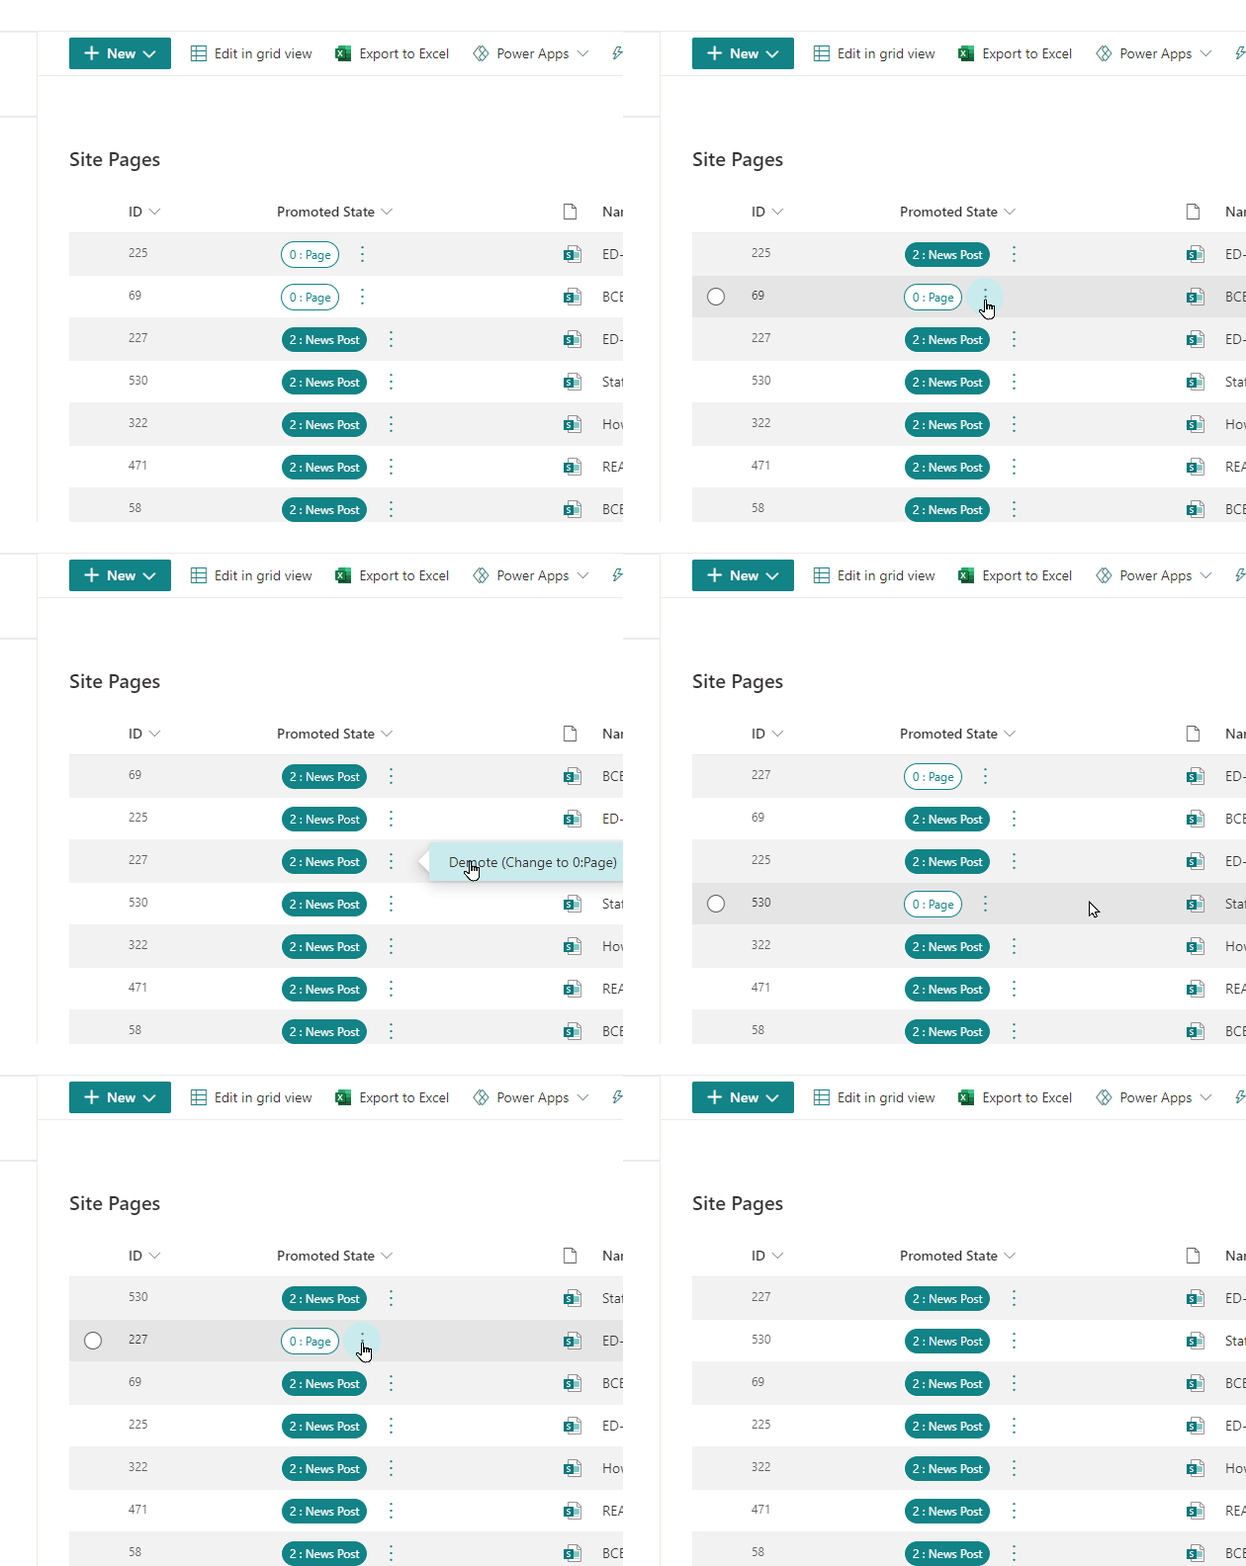
sharepoint news post convert to page

Thanks to Tetsuya Kawahara for the solution – Github

Sharepoint Modern – How to add a Picture Library

Sharepoint Modern – How to add a Picture Library

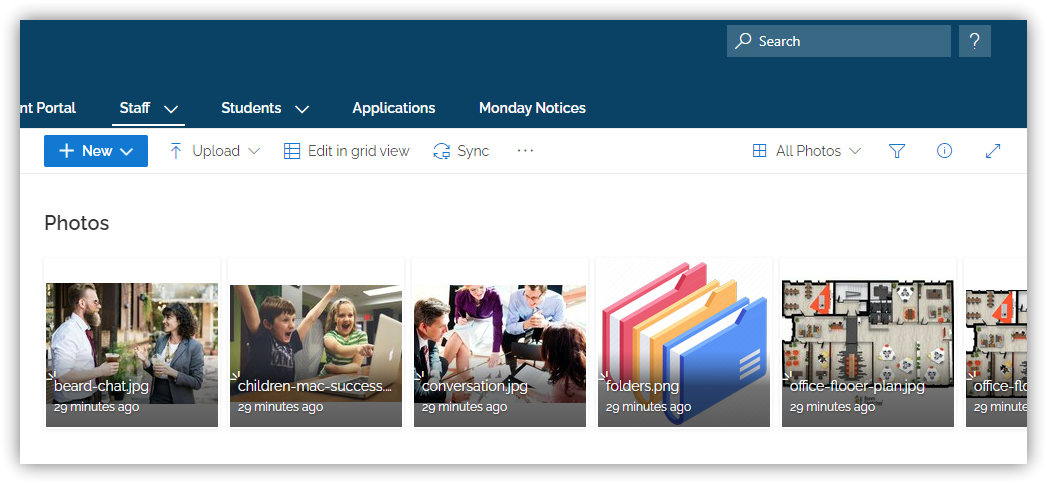
I wanted to create a Picture Library in SharePoint Modern but couldn’t find it as an App to add. Here’s how I solved the problem by creating a library containing images viewable as thumbnails.

Create a Picture Library displaying Thumbnails in SharePoint Modern

  1. Create a Document Library called Photos
  2. Open the new Library Settings – go to Advanced – choose Yes to Allow Management of Content Types
  3. Go back to Library Settings – under the Content types heading – click Change New button order and default content type
  4. Deselect the Document option, then Change Position from top of Picture to 1
  5. Open the Library – Use the Tiles view to see thumbnails of the images
  6. Save this new view as All Photos then set as default view

sharepoint modern picture library solved

Tip – modify the View to display more than the 30 items by default

How to fix: SharePoint opens an extra Browser Tab when opening a Link in the Quick Launch

How to fix: SharePoint opens an extra Browser Tab when opening a Link in the Quick Launch

I keep noticing an issue in SharePoint where Quick Launch links to Document Libraries in our SharePoint Modern sites started opening up an extra Untitled Tab in the web browser. This was driving me and our staff a little nuts.

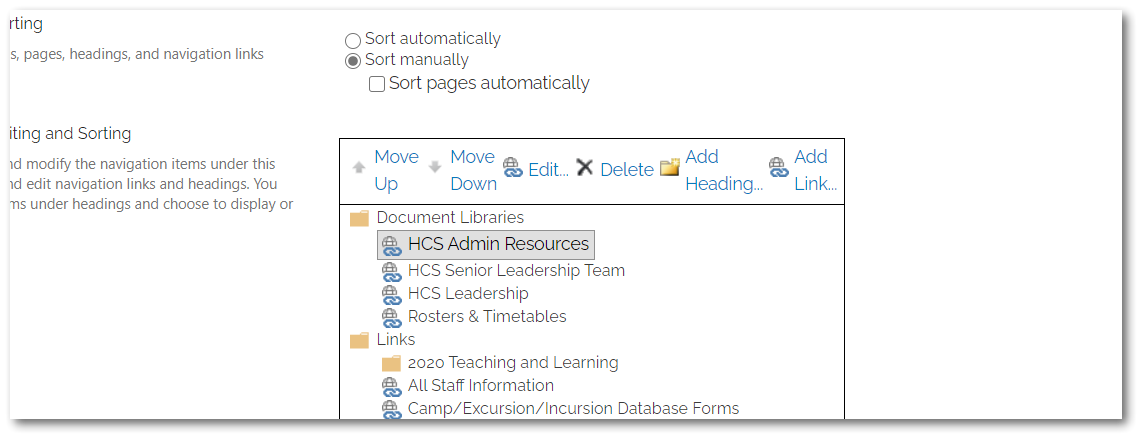
If it’s happening on your SharePoint site – just delete the Quick Launch link and manually create another in the Site Settings > Navigation.

It seems that the cause “may” be with how the link to the Document Library was created. (I’ve found one link and tested this solution so far, maybe confirm in the Comments if you see and fix this the same way…)

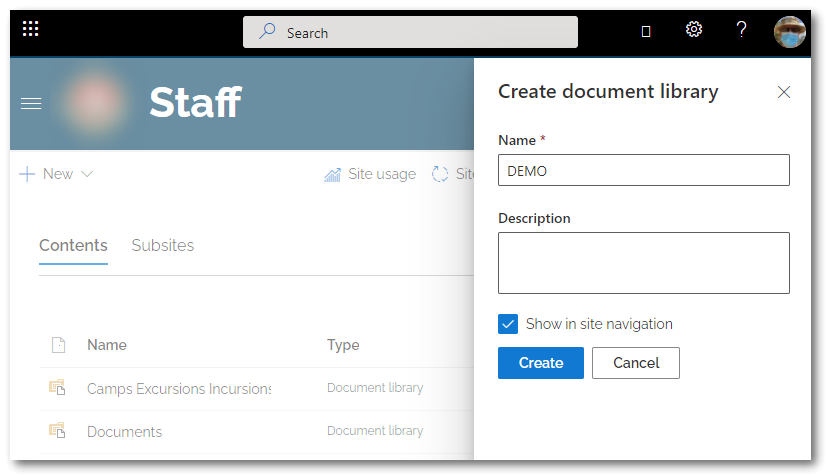
I think if when creating the Document Library from the Site Contents Section New+ button you choose to “Show in Site Navigation” then that created Link somehow opens up an extra unwanted Tab…..However I created a test Document Library and Link – and it worked fine in Edge.

Sharepoint quick launch link opens two tabs extra tab

How to stop SharePoint Quick Launch Links opening an extra browser tab

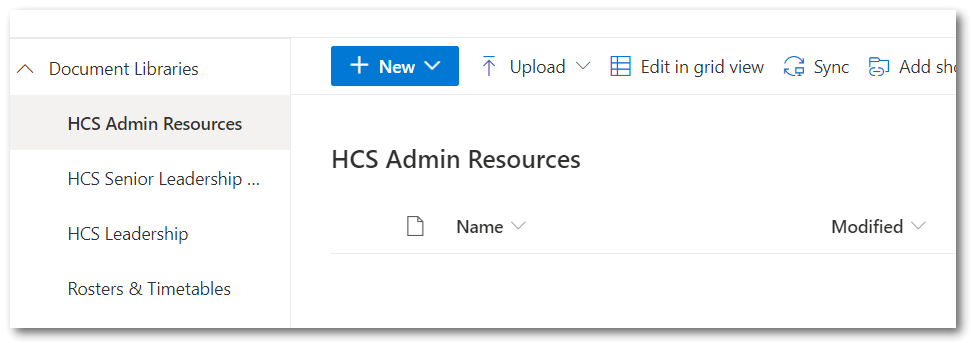
If I create a Document Library in SharePoint and during the create process choose the option to add it to the Quick Launch navigation menu, it may open an extra unwanted browser tab when clicked.  If I then delete that Link and manually create a link in the Quick Launch Navigation the extra tab doesn’t get opened when clicking the SharePoint Document Library Link.

Sharepoint quick launch link opens two tabs extra tab

So I’m advising our Staff to create the SharePoint Document Library then manually create the Quick Launch link to avoid having SharePoint open two tabs when you click the link.