Sync Google Calendar with Microsoft Teams Calendar

Sync Google Calendar with Microsoft Teams Calendar

Our organisation splits collaboration and productivity apps between Office 365 and Google Suite. Email and Calendar is in Google, yet we use Microsoft Teams and SharePoint to collaborate and all the Office apps to create. This results in core information and communications not being available within apps in either suite – aka pain in the ass. Here is how I used Microsoft Flow to copy events from my work Google Calendar to the Calendar in Microsoft Teams (my work Office 365 account) so I can see events in Microsoft Teams.

Because we use Teams heavily to collaborate on Tasks and documents, and also communicate using Chats and Teams Posts, I wanted the Calendar in Microsoft Teams to have the events there that are booked in my Google Calendar. Mainly so I had quick access to it from Teams, but also so my Availability Status in Teams reflected Busy or Available based on my Calendar events.

How to sync Google Calendar with Microsoft Teams

I used the Microsoft Flow Template here:

https://australia.flow.microsoft.com/en-us/galleries/public/templates/50229a20493811e6bf53611364194d1a/google-calendar-to-office-365-calendar/

  1. Connected my Work Google Calendar and Work Office 365 Calendar to Microsoft Flow
  2. Edited the Flow settings:

Microsoft flow to sync google calendar and office 365 calendar

Now when an Event is created in Google Calendar it is copied across to the Calendar in Microsoft Teams (my Office 365 Calendar).

I’m a bit frustrated that this doesnt actually sync with Google – if an event is modified or deleted that event in Teams Calendar isn’t affected. BUT this is something I can live with until we logically move Email and Calendar into Office 365.


How to add a Class Bitmoji to Microsoft Class Teams that your Students Can See

How to add a Class Bitmoji to Microsoft Class Teams that your Students Can See

Class Bitmojis have become super popular since teachers are providing a more blended learning experience for their students.  A Class Bitmoji is simply just a graphical image, usually a PowerPoint or a Google Slide which contains a number of images hyperlinked to the resources that the teacher wants to make available to their students.


Examples of Class Bitmoji below.

What is a Class Bitmoji

The advantage of creating a Class Bitmoji is that it provides a more graphical and fun space for students to access classwork and resources. Especially for junior students who can respond to images and icons a lot quicker than lists of text links.


What is a Bitmoji?

Bitmoji is an app available for free on mobile devices. Download to your phone or tablet and then create a Bitmoji character using facial features, clothing, and bodies – to look like you. Once created you can choose different poses using that created Bitmoji character to represent yourself. You can copy and post those images into your phones messaging apps.  Install the web browser plugin to Edge or Chrome and you can copy those images into any of your computer apps like PowerPoint, Word etc.

Get Class Bitmoji

What is a Class Bitmoji?

A Class Bitmoji is simply a scene you create with hyperlinked objects and then you add a Bitmoji of yourself as the teacher. There are many different tools and methods available to create an image containing hyperlinks but PowerPoint is probably the easiest to use, has the most features and is easy to update when stored in OneDrive.  So we will use PowerPoint to create our Class Bitmoji.


Step One – Open PowerPoint and Start Creating your Class Bitmoji

  • Open PowerPoint and add a Blank Slide, then save the PowerPoint into your personal OneDrive
  • Now click Insert > Pictures and choose Online Pictures
  • Do a search for Room Background, and choose an image and click Insert
  • Resize the image to fit your PowerPoint Slide

Class Bitmoji background

  • Now your background is in, start to add other images representing your classroom
  • Some ways PowerPoint makes this easy
    • Insert > Pictures – choose from Online, Stock Images (images, icons, people, stickers) or images on your computer
    • Insert 3D Models – choose from your computer or from PowerPoint’s collection of resizeable, rotatable 3D Images (some are even animated)
    • Insert WordArt
    • Insert SmartArt and Charts
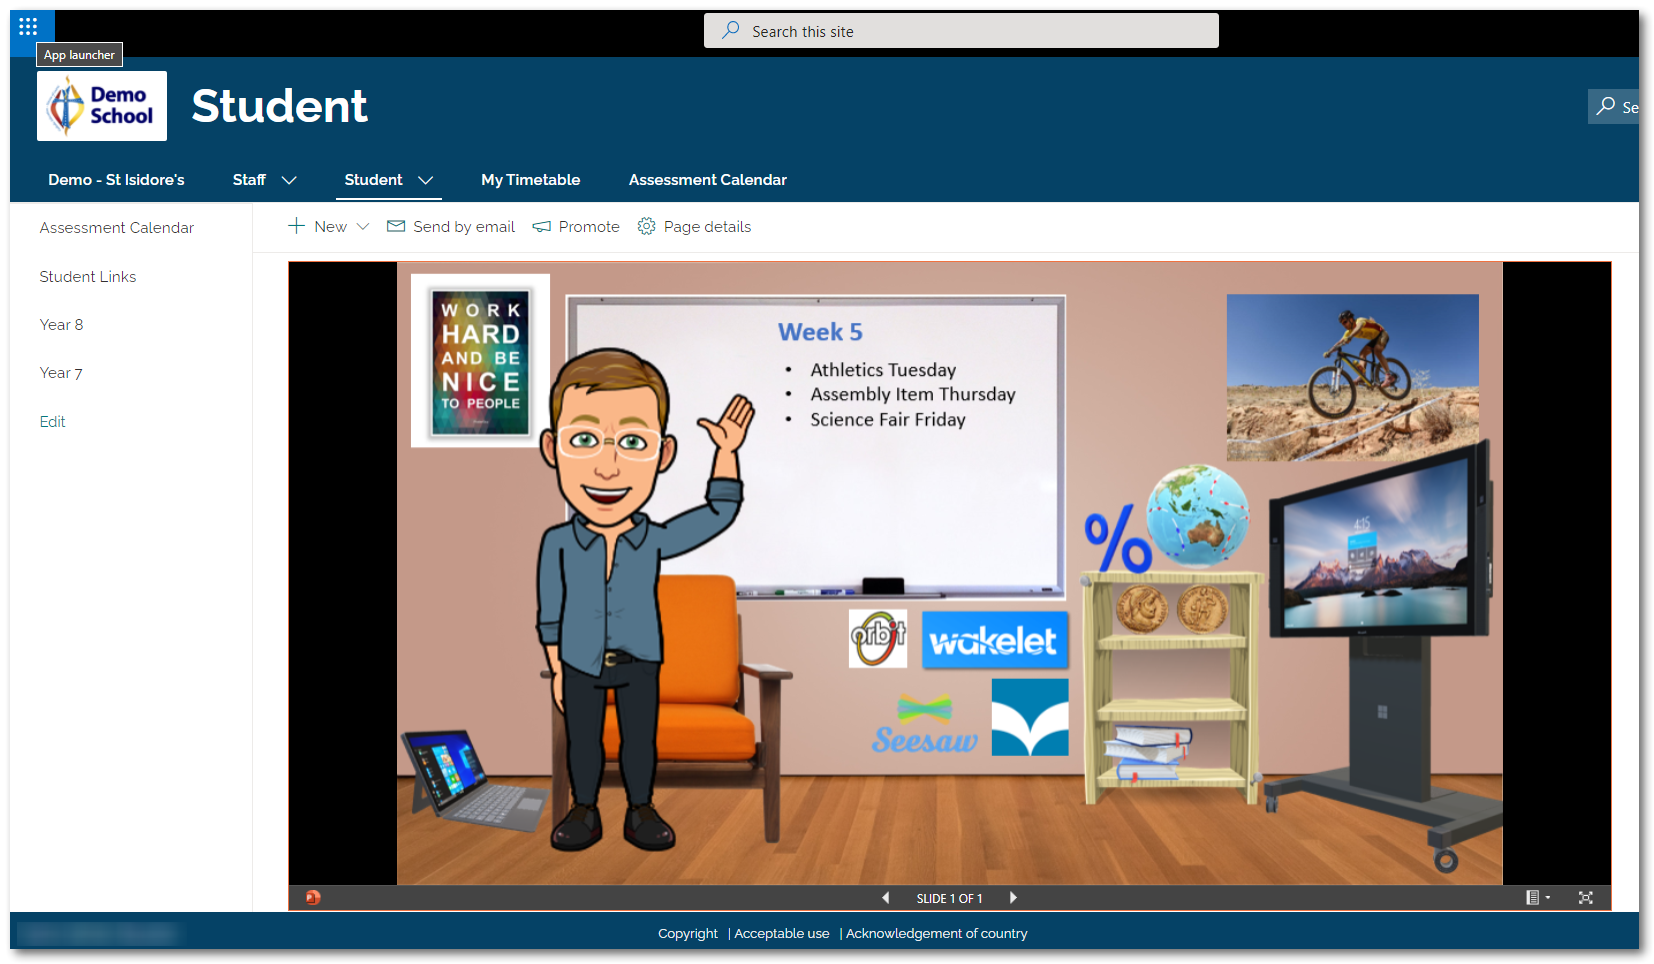
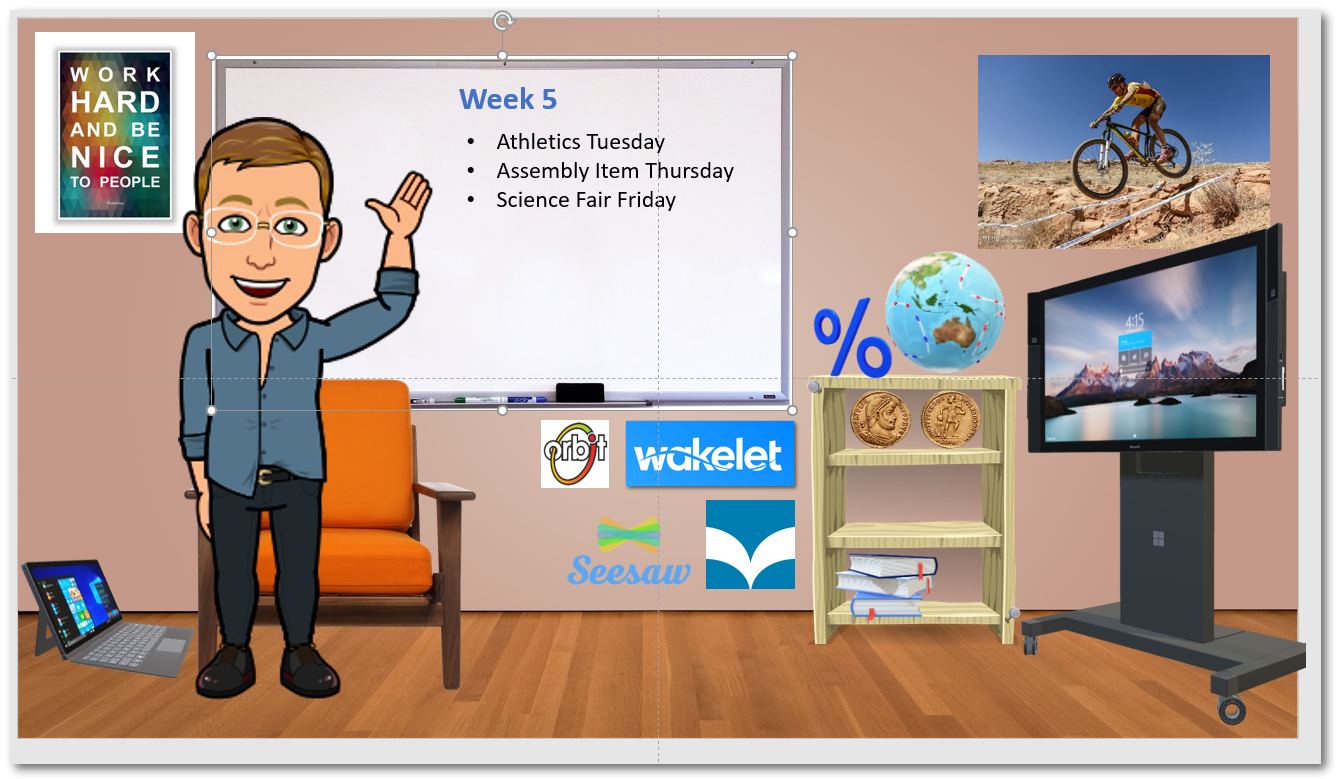
  • I have gone ahead and added – a Whiteboard, chair, poster quote, Roman coins and bookshelf using Online Pictures search (use the “transparent filter” when searching)
  • I added some stock 3D Models – animated globe, books, TV, % symbol, laptop
  • I added some logos for digital tools our students use – Wakelet, SeeSaw, Wheelers e-books and Orbit library catalogue
  • I added a Text box to the whiteboard with major events this week
  • I added a Bitmoji I made of myself and chose the waving pose

Class Bimoji with Powerpoint

Step Two – Add Hyperlinks to your Class Bitmoji

Now you have your Class Bitmoji PowerPoint slide images where you want them it is time to add hyperlinks to each object you want to be “clickable”.

For each of the Objects you want to be a Hyperlink:

  • In your web browser open the webpage you want students to get to
  • copy the URL (web address) from the Address Bar (eg. https://www.wakelet.com)
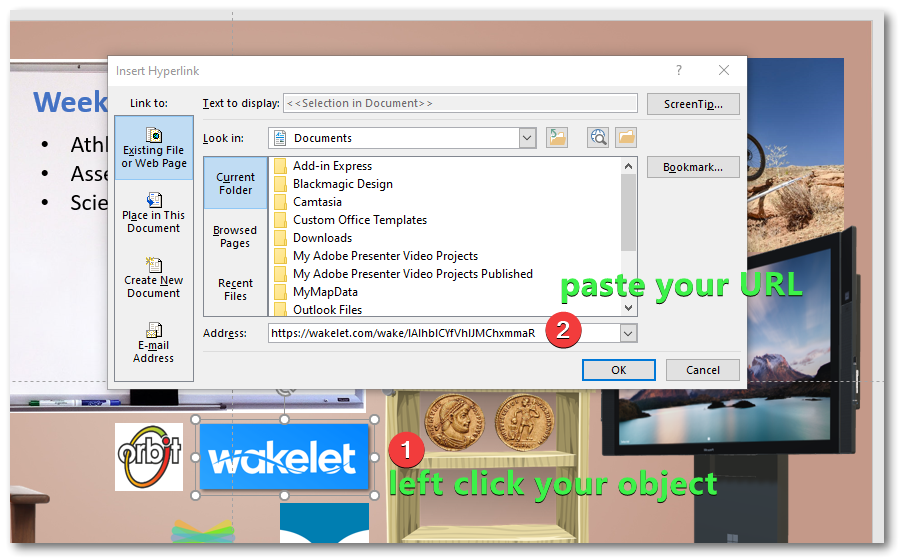
  • In PowerPoint left click your object (make sure its the only object you select) and on your keyboard press the CTRL and K keys (this will open a pop up box ready for you to paste the URL address in)
  • paste your URL and click OK
  • repeat for all objects you want hyperlinked

Class Bimoji with Powerpoint and Microsoft teams

Step Three – Share your PowerPoint

Now from OneDrive we will create the link we need to share our Class Bitmoji inside the Microsoft Team. This can be quite tricky so bear with me. The key is getting the correct URL for adding to Microsoft Teams. Microsoft generates different URLs depending on where and how you share the PowerPoint file.

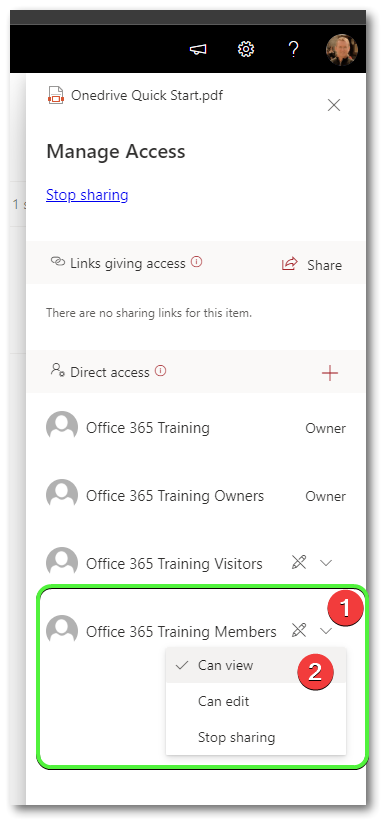
  • In OneDrive set the Sharing on the PowerPoint file so your class can Read it from your personal OneDrive.
    • Right click the PowerPoint file and select Sharing – then change the sharing options to Anyone with the Link Can View (or those in your Organisation can view) click Apply
  • Now right click on your Class Bitmoji PowerPoint file and choose Open In PowerPoint Online
  • your Class Bitmoji PowerPoint will open in your default web browser
  • edit the URL in the browser Address Bar, deleting everything after action=
  • and replace the deleted text with embedview, then click Enter
  • so now my URL looks like this
    Bitmoji classroom into Microsoft teams show view online embedview
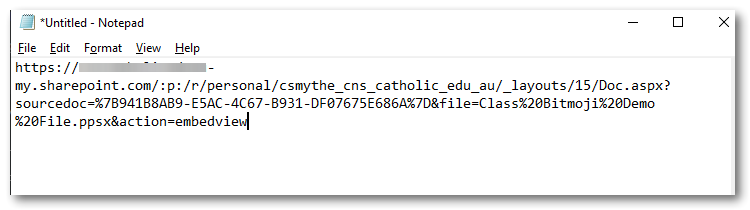
  • it is this URL which we need to copy and paste into Microsoft Teams
  • from the browser tab copy the full URL then open Microsoft Teams, to your Class Team

How to add Class Bitmoji to a Microsoft Class Team

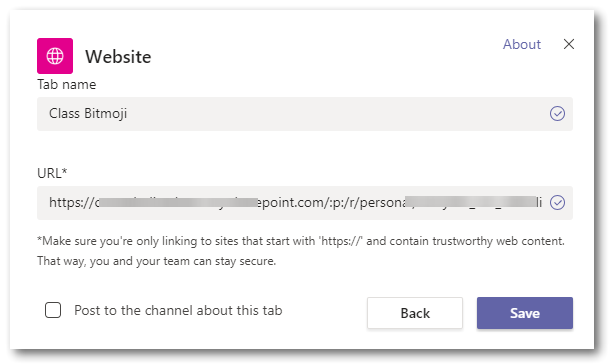
  • In your Class Team, add a new Tab and choose Website
  • Change the name of the Tab to whatever you want Students to see
  • Paste your modified link that you copied from Notepad
    Class Bimoji with Powerpoint and Microsoft teams

Now when students open your Class Team and click on the Class Bitmoji tab, they will be presented with your hyperlinked class image!

Class Bimoji with Powerpoint and Microsoft teams


How to make changes to your Class Bitmoji

This is the beauty of saving the Class Bitmoji PowerPoint in your OneDrive. You can simply open it from OneDrive and make your changes. The Class Bitmoji in your Class Team will automatically reflect those changes as you save them.  Just open the Class Bitmoji PowerPoint and make whatever changes you need. Create different Class Bitmoji depending on the time of the Year or what the learning focus might be in your class. Have some fun.


Also embed your Class Bitmoji in SharePoint

If your school is also using SharePoint you can embed your Class Bitmoji there. On your Class Page, add the Embed webpart, paste in your modified URL (the one you added embedview to earlier) and save.  Again – any changes you make will automatically update here when you edit your Class Bitmoji from OneDrive.

Class Bimoji with Powerpoint and Microsoft teams


Microsoft Teams – How to make a File Read Only in the Team’s Files Section

Microsoft Teams – How to make a File Read Only in the Team’s Files Section

By default when you add a File to your Microsoft Team’s File section – it becomes editable by all your Team Members. There are times when you dont want everyone to edit that file, only read it.

So here is how you can add a file to Teams and make it Read Only.

(Related Post: Click here to see my guide on creating a Read Only Folder in Teams)

How to Create a Read Only File in Microsoft Teams Files Section

First open up your Microsoft Team and click the Files Tab
Click the Open in SharePoint button

Add a read only file to microsoft teams

In SharePoint, click the Upload > Files then browse for your selected File

upload read only file to sharepoint


Now hover over the File and click the More Options ellipses (3 vertical dots) and then click Manage Access

managa eaccess files in sharepoint read only teams


Click the drop-down to change Team Members permissions and select Can View so the File becomes Read Only for Members. Changes will save automatically

read only file teams

This will set the Permissions on that File so that Team Owners only are able to edit the File, but not Members.

If you found that Tip useful, please share with someone else!

YouTube Channelhttps://youtube.com/channel/UCRpmmEBtbXNbUUKsIlfGHUQ

buy surface pro 7
Remote Learning from Erub Island, Great Barrier Reef

Remote Learning from Erub Island, Great Barrier Reef

Class Teams supporting Remote Students

St Augustine’s College Cairns is one of our schools working with SDS created Microsoft Class Teams. These Microsoft Teams are created and managed with a daily sync between the college’s student administration system and our Office 365 Tenant so that Microsoft Class Teams are created and managed for each timetabled class.

The SDS sync continues to manage the class from the timetable so if students or teachers move between classes their access to the correct Class Team continues.

Microsoft Class Teams provides the class (Teacher and Students) with a discussion section, shared (and Read only) file section, a Class Onenote notebook to distibute pages, an Assignments tool and also the ability to integrate other apps such as Flipgrid, SharePoint Portals, Wakelet and many others.

The other Teams features such as Chat, video meetings, video and audio calls are also able to be initiated by the teachers.

A new Insights tool also provides the Teacher only with a look at when the students are working on documents and how they are engaging in the Class Team Posts section and Assignment progress.

Here’s Cyril, a Year 7 student at St Augustine’s College Cairns engaged in remote learning from his home of Erub Island near the Great Barrier Reef in the Torres Strait.

This looks to be the best desk in the world to me right now!  I chatted with Cyril using Teams Chat today and his feedback on Teams – “it’s working and easy to use”.


Microsoft Teams – Use a Status Message

Microsoft Teams – Use a Status Message

Setting a Status Message in Teams is a really easy way to update the people most likely to contact you during the day.  Your Status Message simply provides other staff with a bit more information. Maybe you’re working away, at a conference or inservice.  Maybe you’re available but can’t use you video and microphone.

You can set your Status Message to appear above the Compose Box when someone is messaging you in Chat or mentioning you in a Post.

Here’s how to set it up:

  1. Start by clicking your Profile Picture and click Set Status Message
  2. Type in your message
  3. Choose to Send your Status if someone messages you in Teams
  4. Set an Expiry Date for your Status Message

Your Status Message will also appear in the information popup when someone hovers their mouse pointer over your Profile Picture within Office 365