Minecraft: Education Edition – How to add a custom skin on your computer

Minecraft: Education Edition – How to add a custom skin on your computer

Skin pack Creator for Minecraft

Game players love creating and customizing their character skins – their appearance. This guide shows you how you can customize your appearance in Minecraft: Education Edition.

If you want to do this on your iPad see the guide HERE

If you want to make a skin with Slim features use the app HERE

Minecraft Education Edition requires you to create a MCPACK file which contains all the files required for your custom Minecraft skin. The PNG image file and a couple of JSON files.  Matt’s work means you only need to have the PNG image and his online tool will create the JSON files and package those with your image into the MCPACK file required by Minecraft.

So now only a couple of steps are needed – lets get into it.

Step 1 – Create your Custom Minecraft Education Edition Skin

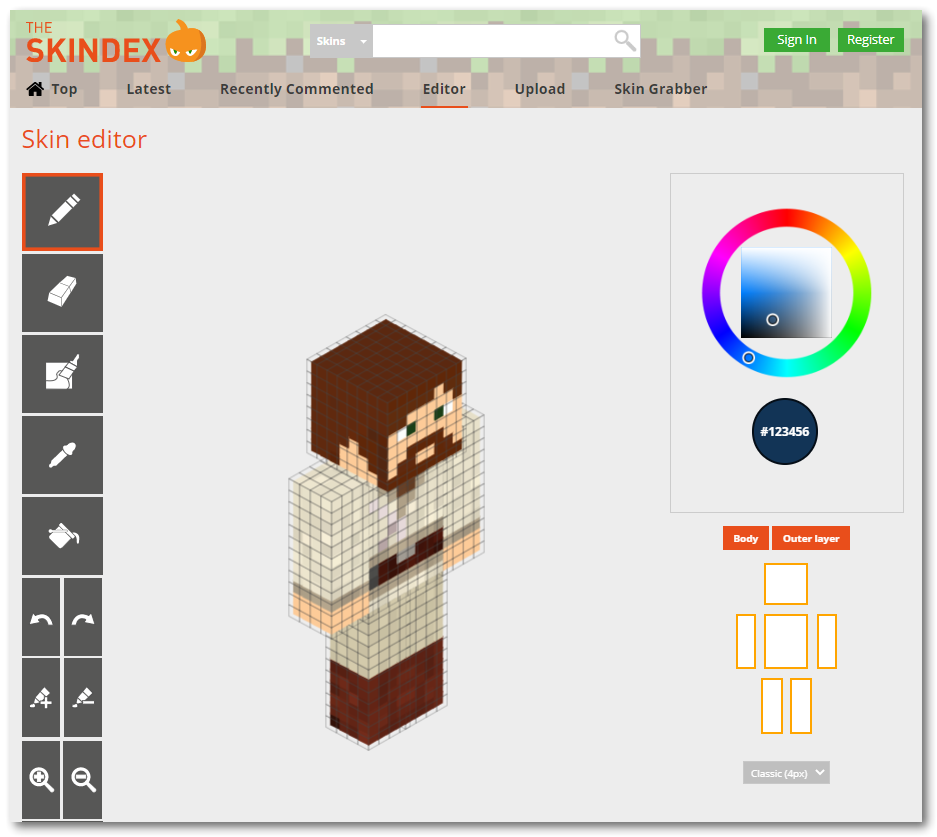
  • go to The Skindex – create, edit and download the PNG file required for your new custom Minecraft skin
  • (you can go to any site that has PNG files of skins, also see https://mcpedl.com/)

Step 2 – Create the MCPACK File

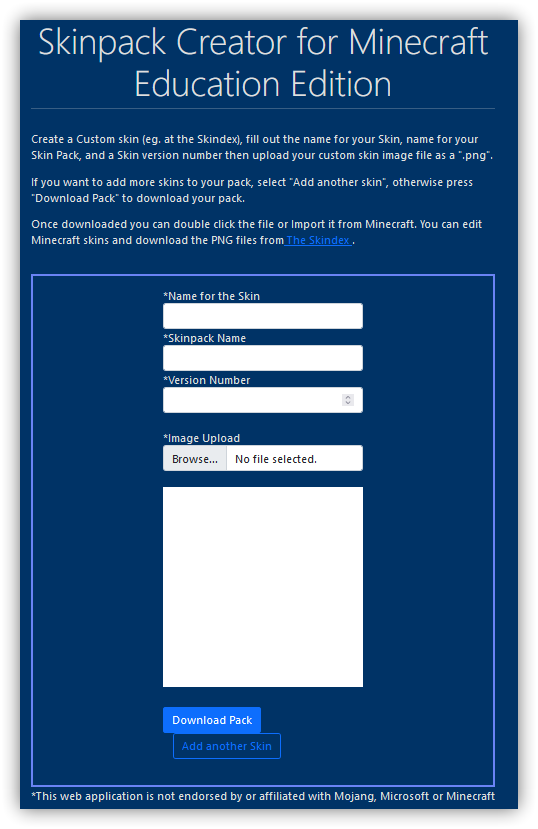
minecraft skinpack creator
  • Complete the Form with the Name of your Skin, Name of your Skinpack and a Version number for your Skinpack (can be any number)
  • Browse to your custom skin PNG file and select
  • If you want to add more Skins to your skinpack click the Add another Skin button.
  • Save the generated MCPACK file containing everything for Minecraft Education Edition to your computer
  • double click the file which will trigger opening Minecraft Education Edition and the import of your new custom skin will happen automatically or open Minecraft Education Edition and choose to Import the MCPACK file.

After your MCPACK Skinpack file is imported it appears in the Skins section of Minecraft Education Edition for you to select

skin pack creator for minecraft education edition custom skin

The Skindex how to add Minecraft Education edition customskins
Minecraft: Education Edition – How to Add Custom Skins

Minecraft: Education Edition – How to Add Custom Skins


Updated: November 24 2020

NEW UPDATED POST – Click this link to my latest guide – there is now an even simpler method making use of a new Skin Pack Creator tool  – the tool will create the mcpack file for you).

In Minecraft you are able to click the Hangar on the Home page and choose a different “Skin” for your character. Your Skin – is what you look like in Minecraft.  When you click the Hangar you will see a number of Skin Packs available from which you can select a new Skin for your Character.

Check Out – YouTube Hacks for Students and Teachers 2021

But it’s not easy to import new Skins into Minecraft: Education Edition to select from. A Skin Pack requires three JSON files to exist along with the PNG image files of the Skins. There are free online Minecraft Skin makers available like – Minecraft Skins – where you can create and download the PNG image.  But I cant find anything to easily generate the JSON files needed. For this example I’m not going to work with the Slim character skins.

This guide takes you through the process of creating a Skin Pack and importing it into Minecraft: Education Edition.


Step One – get template files and images

Gather Resources to Create your Skin Pack

You’ll need the following to create your own Skin Pack for Minecraft: Education Edition

  • A short name for your skinpack
  • two PNG image files for the actual skin textures you want to use – check out Minecraftskins.net
  • Two unique Version 4 UUID numbers – generate these from UUIDgenerator.net
  • Three files to edit:
    • manifest.json
    • en_US.lang (or en_UK.lang depending on the Language you have set to use in Minecraft: Education Edition)
    • skins.json

Download an Example and a Template set of these files to customise for yourself from here

Below I will show you how to edit the Template files and use the Example files as my intended skin pack. So I will end up with a Skin Pack titled – Smythe Example Skin Pack, which contains two skins called HanSolo and Stormtrooper.

Step Two – Edit Files

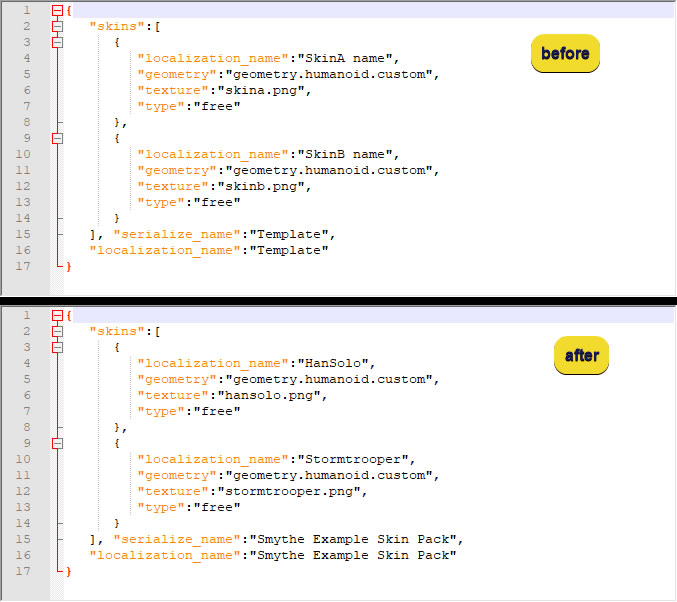
Edit:   skins.json

Open from the template pack – skins.json
Replace all the following text variables (including the brackets) with your names

  • SkinA name = change to your first skin name
  • skina.png = change to your first skin filename
  • SkinB name = change to your second skin name
  • skinb.png = change to your second skin filename
  • Template = change to your Skin Pack name
Minecraft skins in Mincraft Education edition

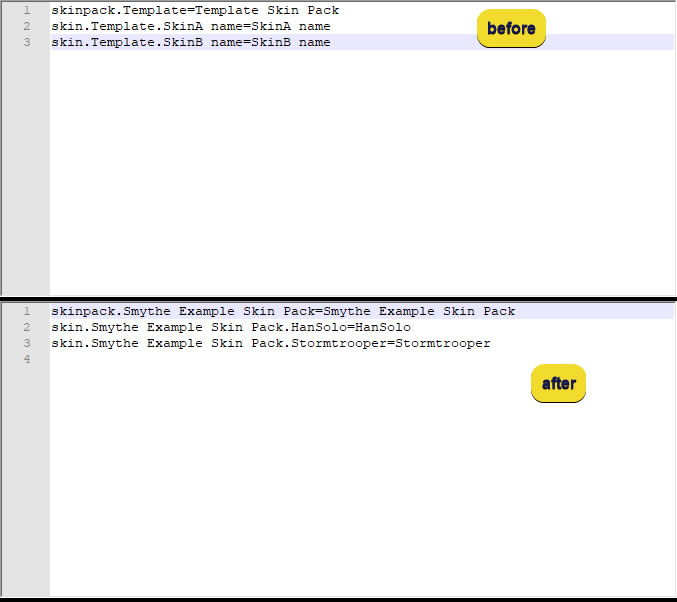
Edit:   en_us.lang

Open from the template pack – en_us.lang (assuming that’s the Minecraft Language setting you’re using)
Replace all the following variables (including the brackets) with your names

  • Template = change to the name of your skin pack
  • SkinA name = change to your first skin name
  • SkinB name = change to your second skin name
Minecraft skins in Minecraft Education edition

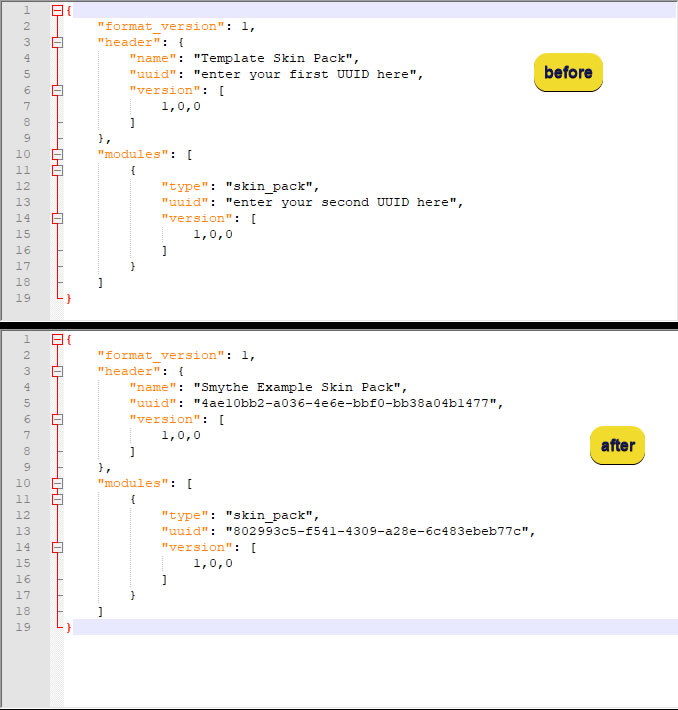
Edit:   manifest.json

Open from the template pack – manifest.json
Replace all the following variables (including the brackets) with your names
Visit uuidgenerator.net to generate two unique UUID number for this file

  • Template = change to the name of your skin pack
  • first UUID  = generate UUID 1 from uuidgenerator.net using version 4 UUID
  • second UUID  = generate UUID 2 from uuidgenerator.net using version 4 UUID
Minecraft skins in Minecraft Education edition

Step3 – Create .mcpack file and install in Minecraft: Education Edition

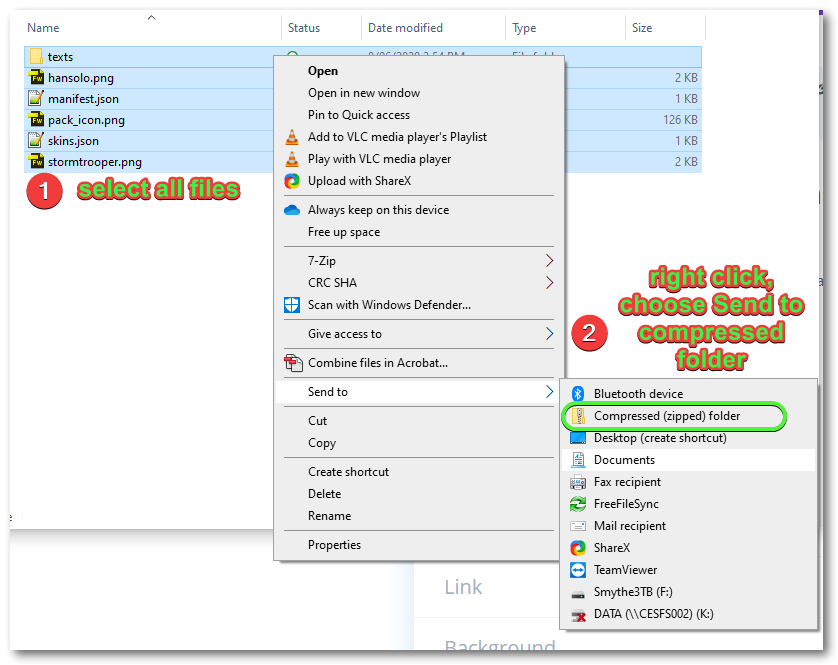
Now that you have all your files ready, you need to create a compressed file to import into Minecraft: Education Edition

  1. Select all the Files in the template folder
  2. Right click and choose – Send to compressed (zipped) folder
Minecraft skins in Minecraft Education edition

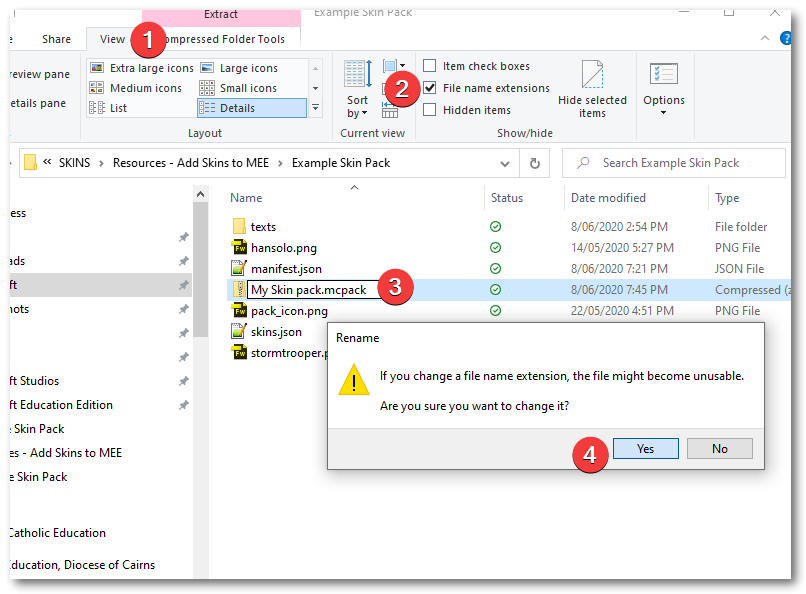
Change the compressed file type from zip to mcpack

  1. In File Explorers View tab,
  2. make sure File Name Extensions is selected,
  3. change the zip text to mcpack
  4. click YES on the warning popup to accept the change


Minecraft skins in Minecraft Education edition

To install your Skin Pack into Minecraft: Education Edition:

  1. Open Minecraft: Education Edition
  2. Browse in File Explorer to your skin pack mcpack file and double click it. This will start the import into Minecraft:EE

Additional Notes

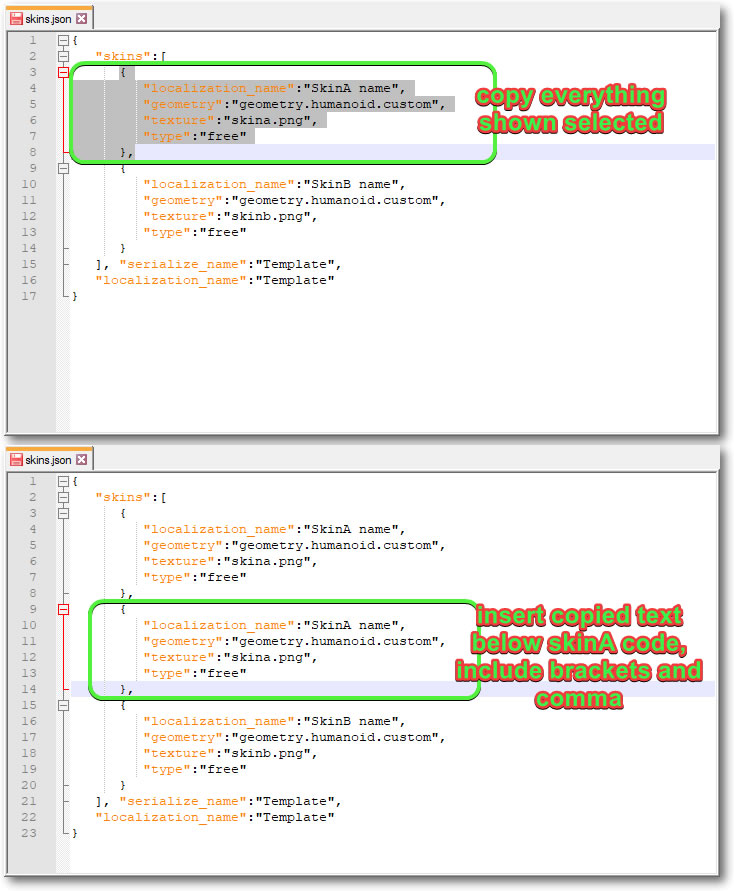
If you want to add more Skins to your Pack:

  • en_us.lang – add additional lines
  • skins.json – copy and paste the code section for SkinA and edit accordingly with skin name and file name

Designing Skins?

Minecraft skins in Minecraft Education edition
buy minecraft pocket edition
Minecraft: Education Edition – Create your own Skins

Minecraft: Education Edition – Create your own Skins

In Minecraft the appearance your character has is referred to as your Skin. Like most gamers, players in Minecraft love to change their characters skin from the default to something else either known or uniquely created by them.

This article will introduce you to some free resources for downloading and creating Minecraft skins for Minecraft Education Edition.

Add Custom skins to Minecraft Education Edition – See this other article on how to get your Character Skins into Minecraft Education Edition once they have been created.

NEW POST – YouTube Hacks for Students and Teachers

minecraftskins.net

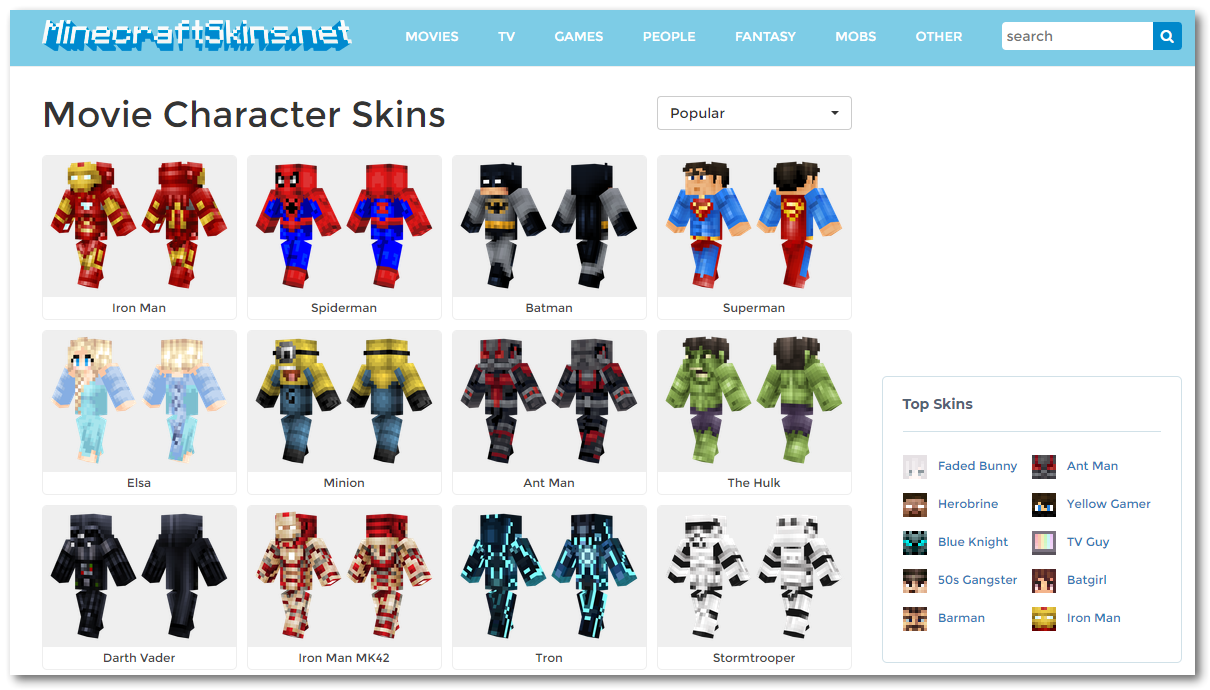
Minecraftskins.net is a good starting point where you can browse and download a Minecraft skin but also edit a skin and create your own. All the necessary editing tools are available and I like that you can change the pose of your character so see more fully what you have created.

The Skindex

The Skindex is similar but has a cleaner looking Skin Editor. This one may appeal to students more as it has less clutter and perhaps an easier editing interface to work with. Easily switch between Slim and Classic skins. It has a better colour picking tool than MinecraftSkins giving you many more options.

Minecraft Education edition skins

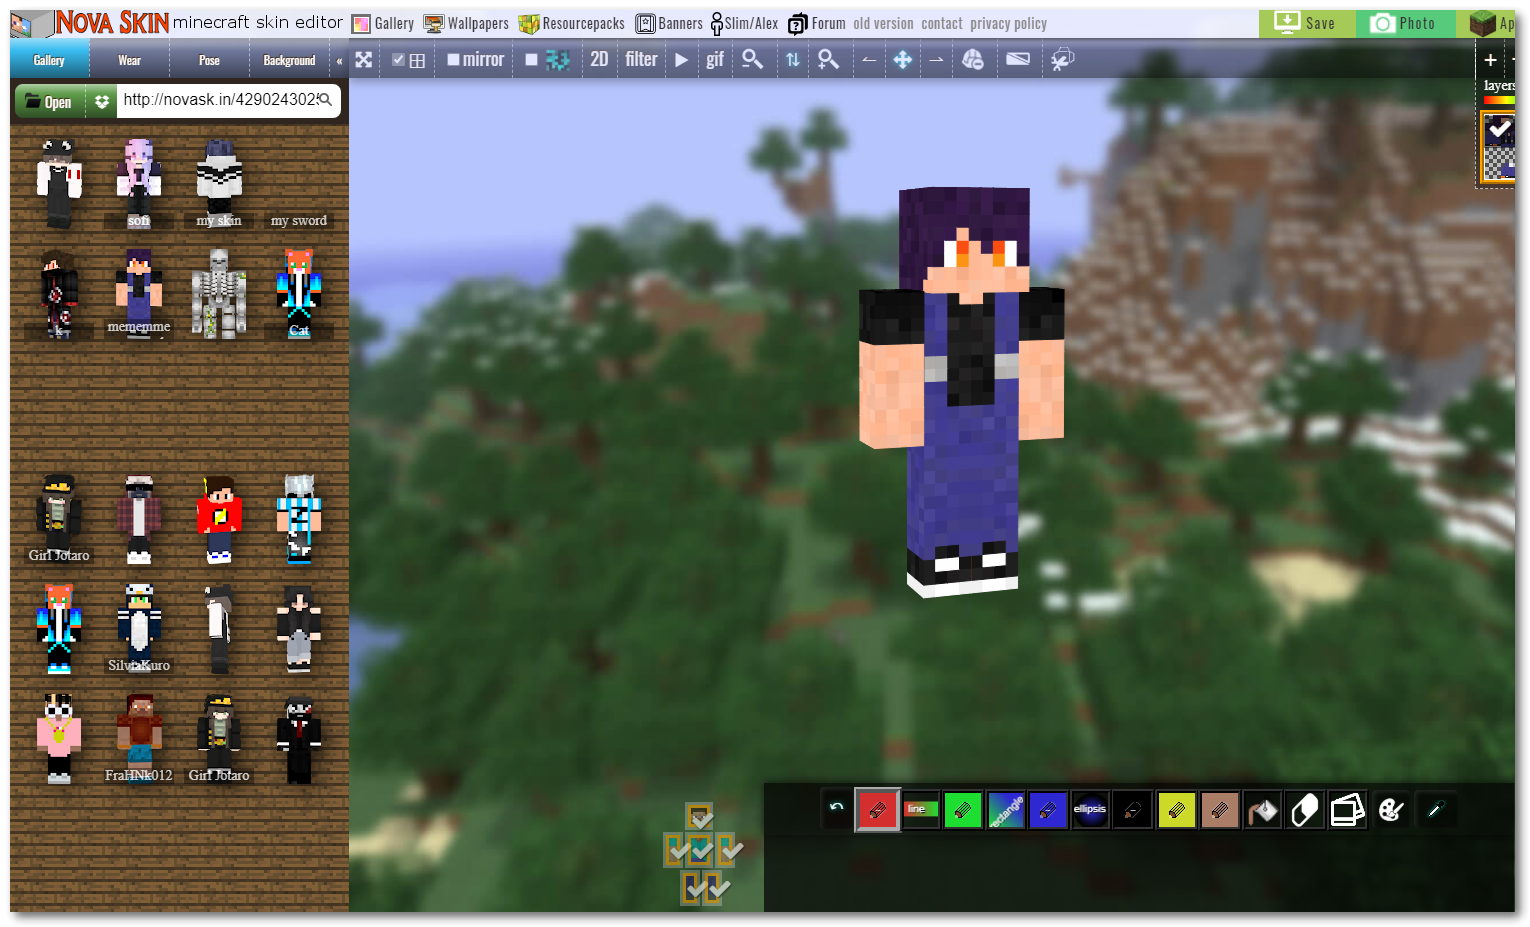
Nova Skin has a great interface to work with, bright and colourful for students – almost feels like you’re in Minecraft designing this character. Change the editor background to a number of available Minecraft images. All the creative tools expected are available with addition of a couple of tools I like – the Camera to take a snapshot of your skin and also a GIF tool to create an animated GIF of your creation which you can also download.

Nova Skin provides a number of pre-created features you can easily apply to your skin – eg. clothing, hair, shadow, outfits.

Minecraft Education edition skins

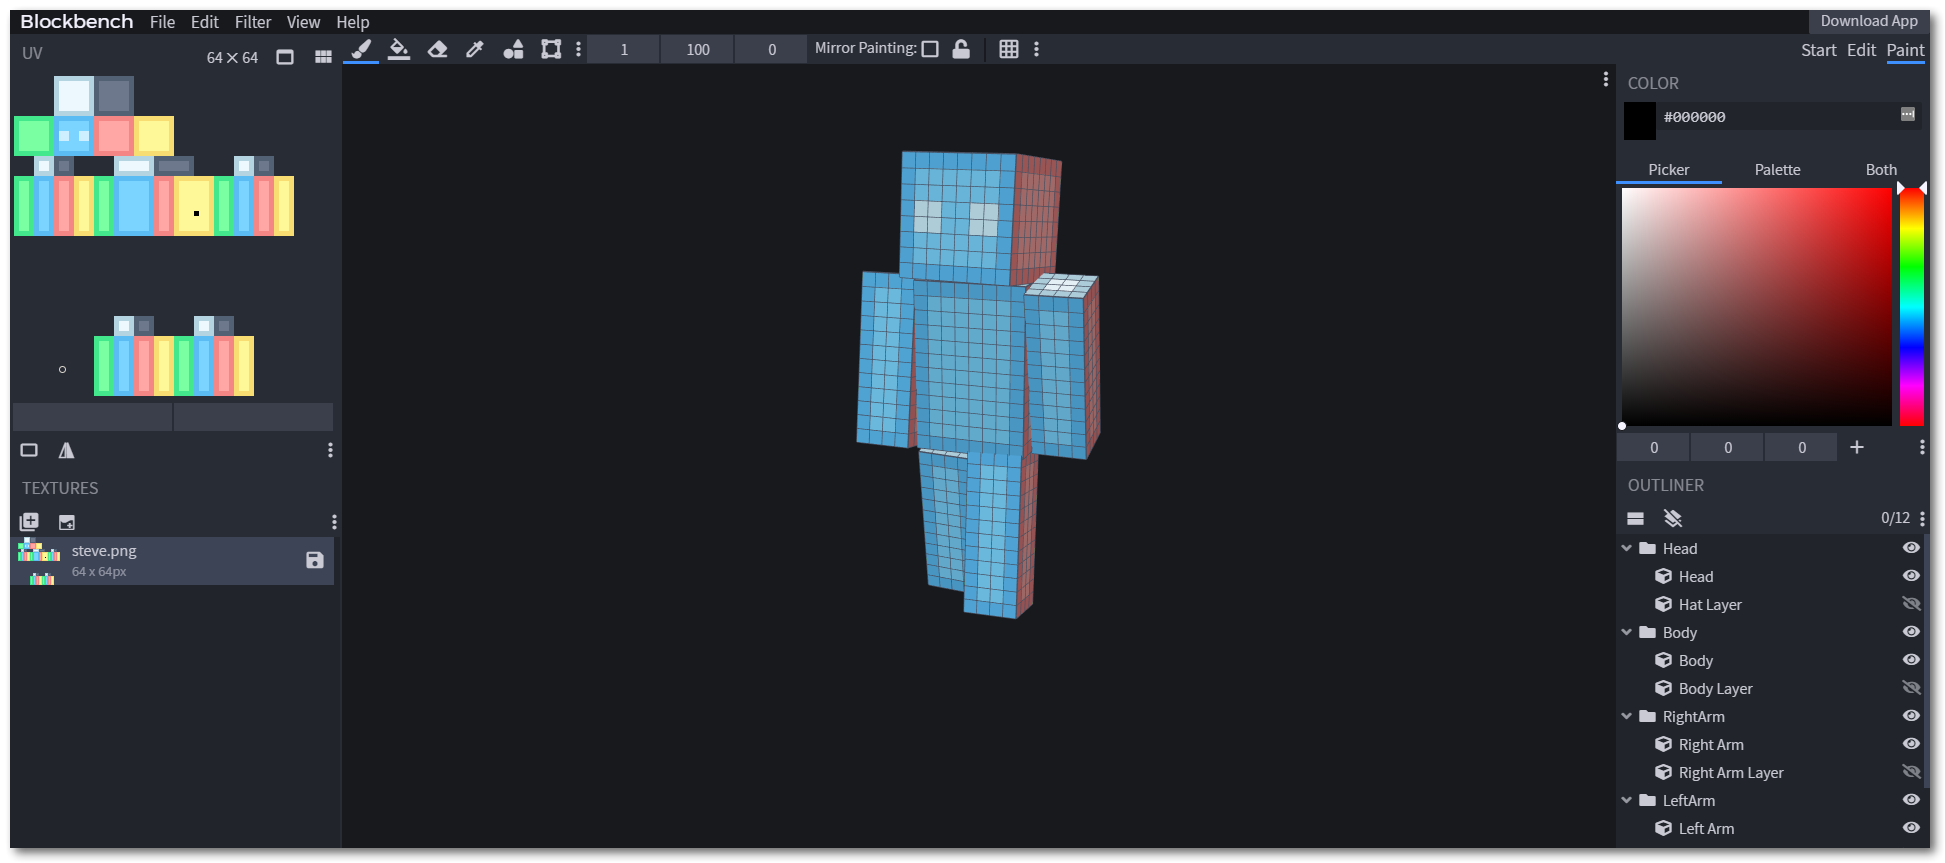
When you first open Blockbench you might think you’ve opened a professional photo editing program, it just has that appearance. But do not hesitate to start using it. You will find it very intuitive and before long you will have the skills to not only create character skins for Minecraft Education Edition but also other models and items for Minecraft. You are really creating from scratch here – there are no user created catalogues to access other than your own.

Blockbench is available to access for free online and also on your device. Download it for Windows, MacOS or Linux.

Those are the editing tools I’d recommend for creating skins for Minecraft Education Edition. Remember it’s not easy to get these created skins into Minecraft so check out my guide on how to do that here.

buy minecraft pocket edition
Minecraft: Education Edition – Void World

Minecraft: Education Edition – Void World

Hey if you’re looking for a Void World to use in Minecraft: Education Edition you can download one from here:

How to Import Minecraft Education Edition Void World into Minecraft:EE


1 – Download the Void World mcworld file and save on your computer

Download Void World for Minecraft Education Edition


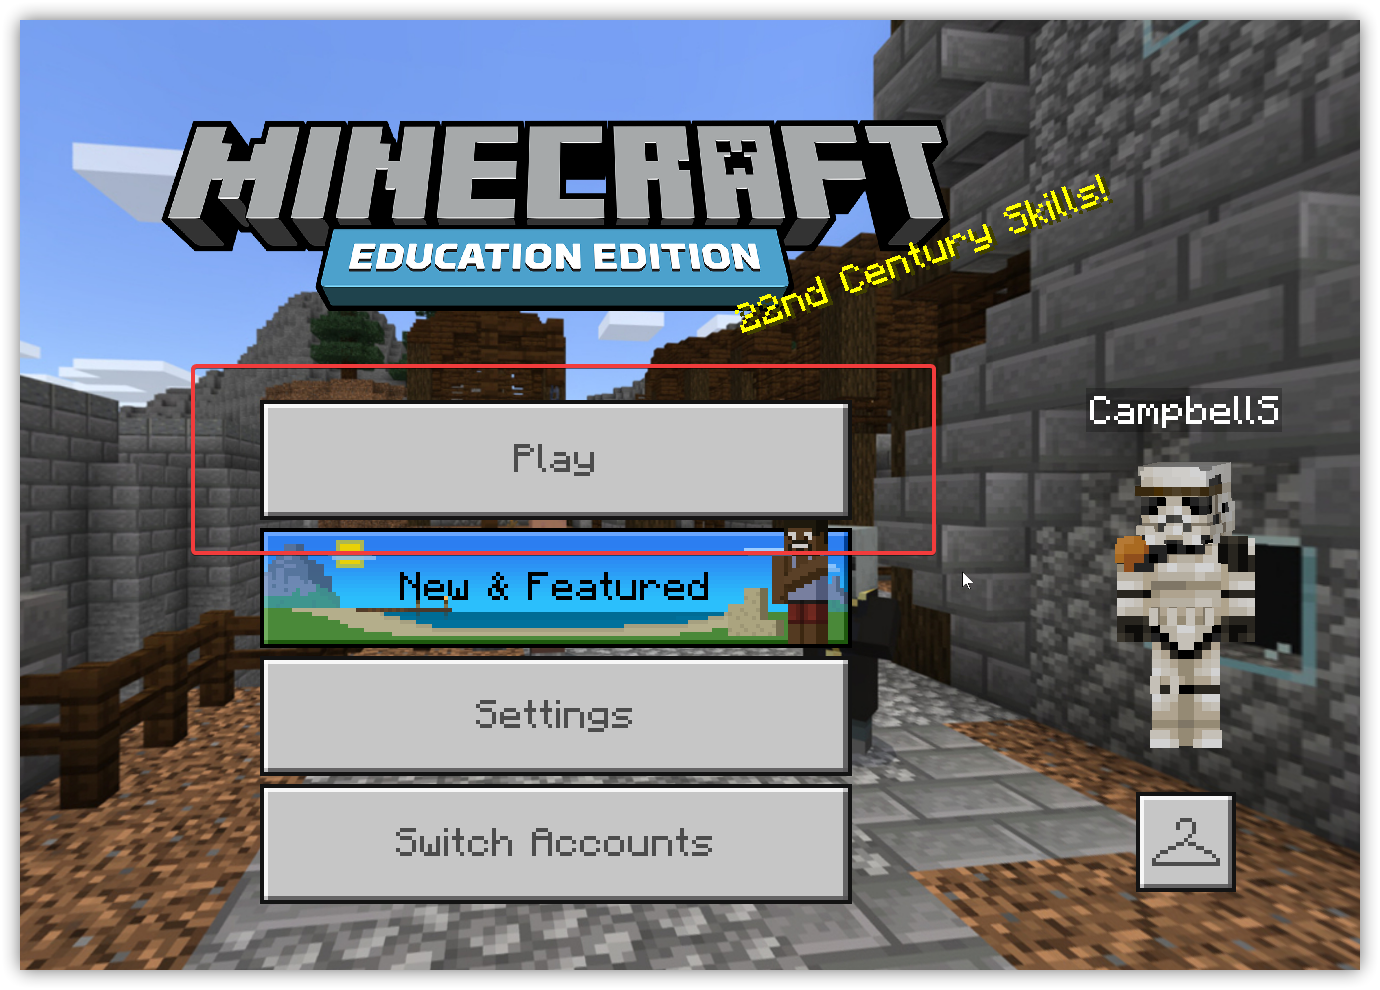
2 – Open Minecraft: Education Edition and Click Play

minecraft education edition void world download free 1


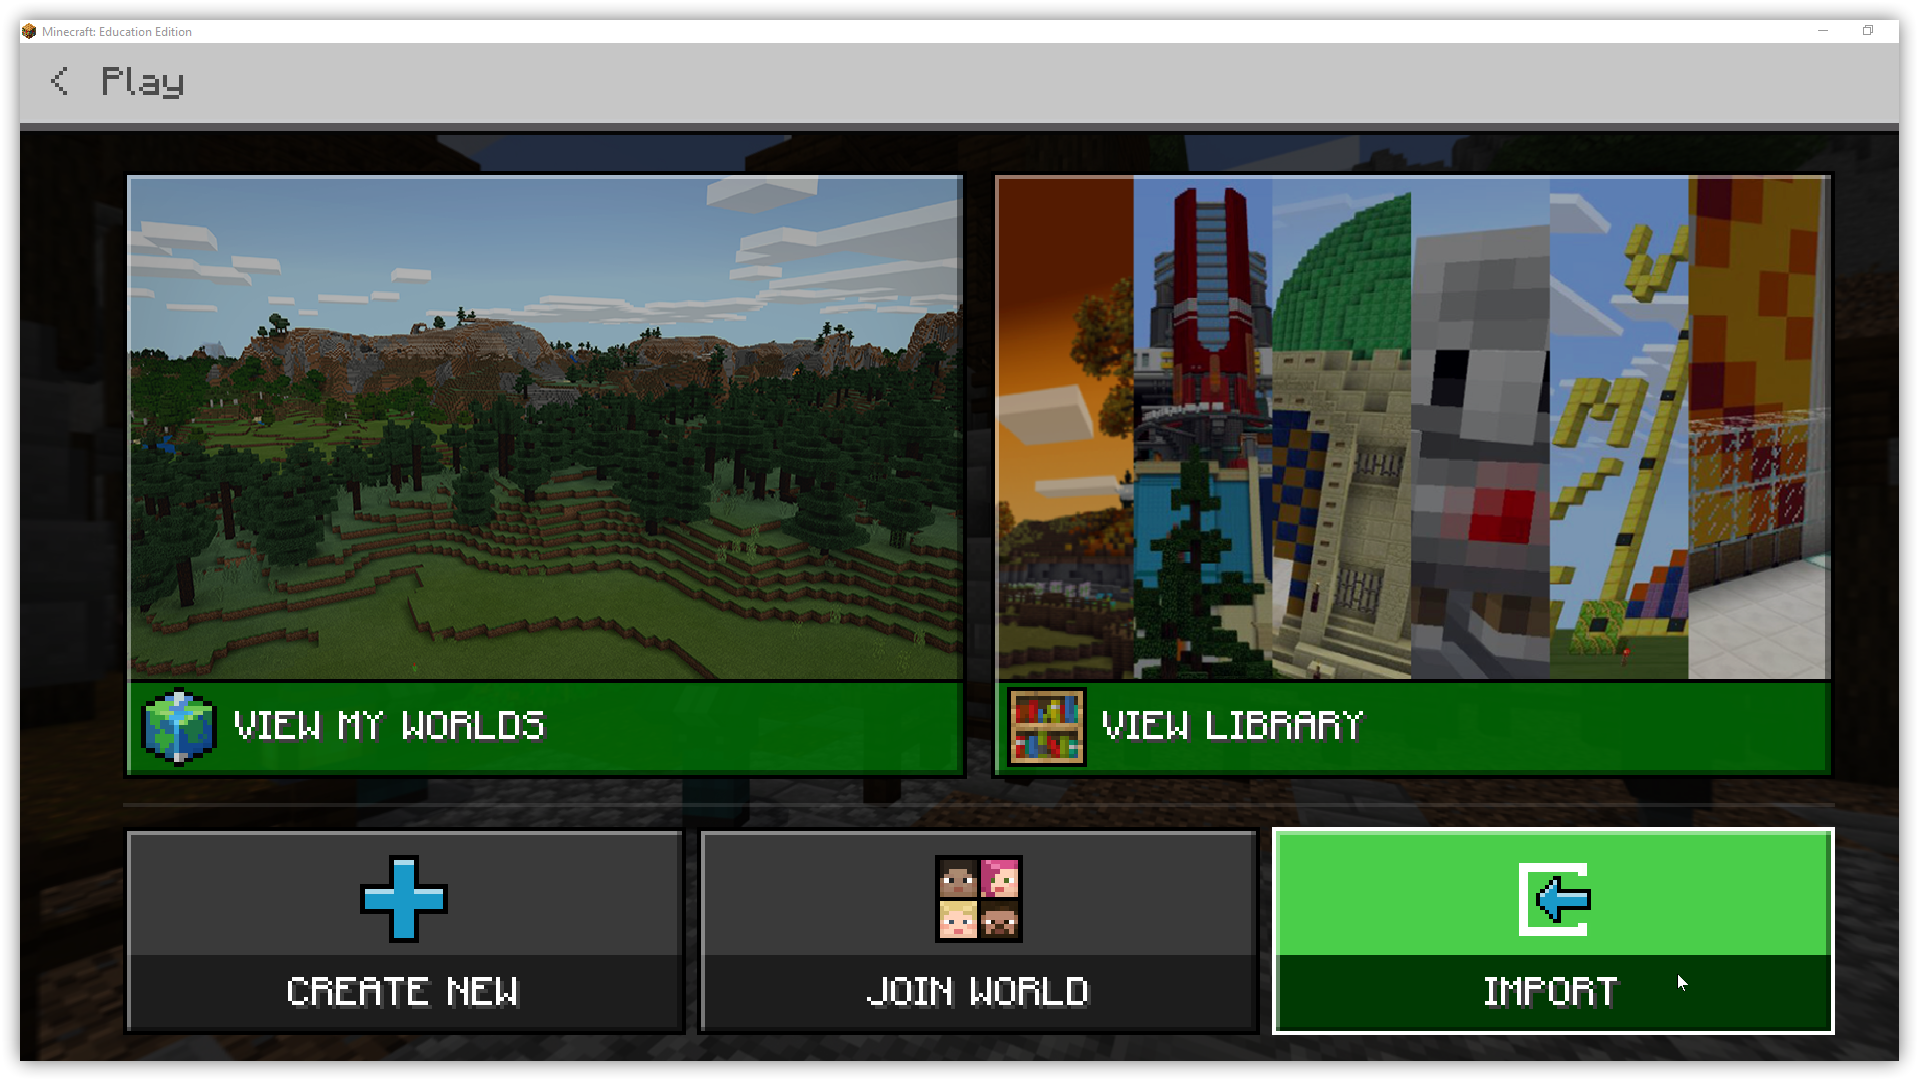
3 – Click the Import button and browse your device, select the downloaded Void World, click OK

minecraft education edition void world download free


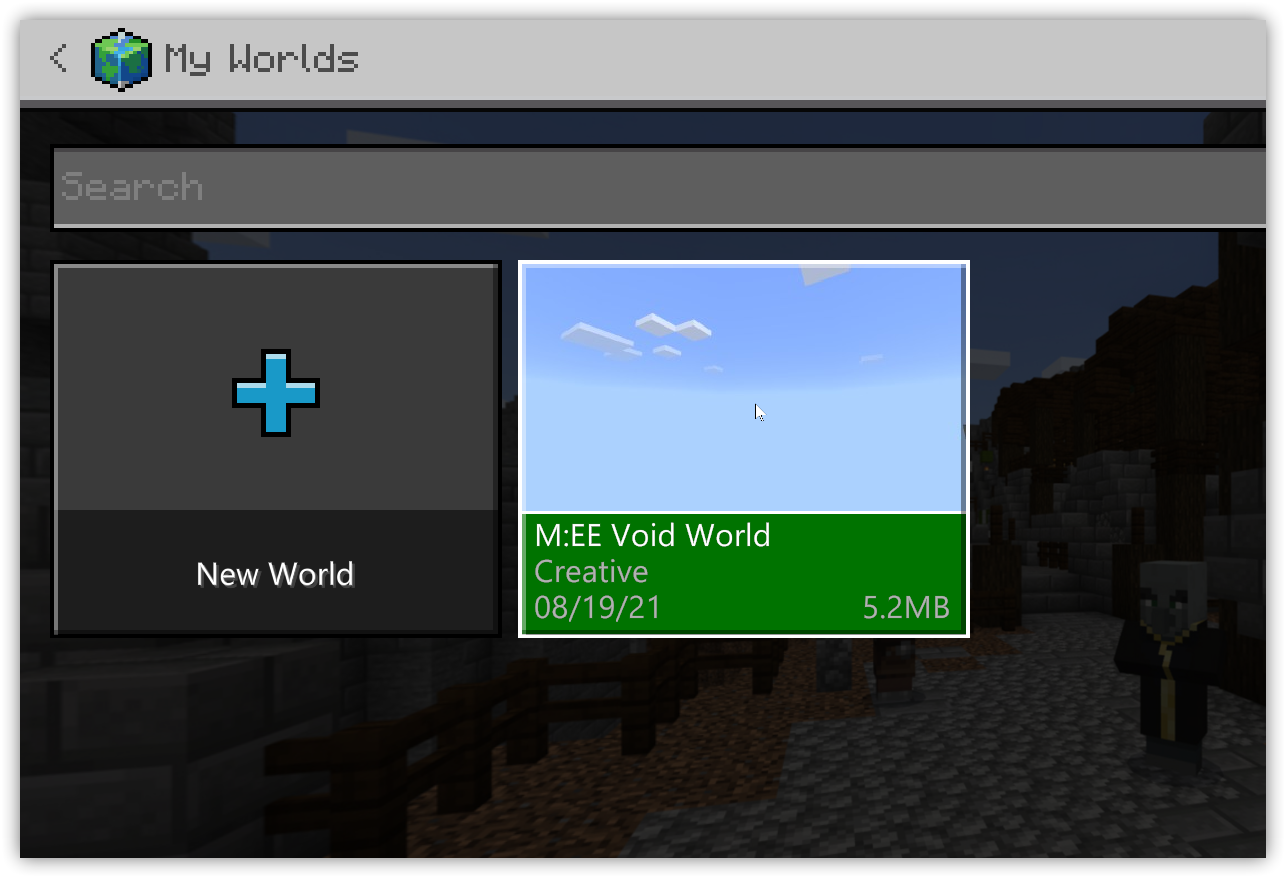
4 – Click View My Worlds to open the M:EE Void World in Minecraft Education Edition

minecraft education edition void world download free 1

Minecraft: Education Edition – How to Delete Custom Skins

Minecraft: Education Edition – How to Delete Custom Skins

Ok so here’s how to Delete a Skin you have added to Minecraft Education Edition.

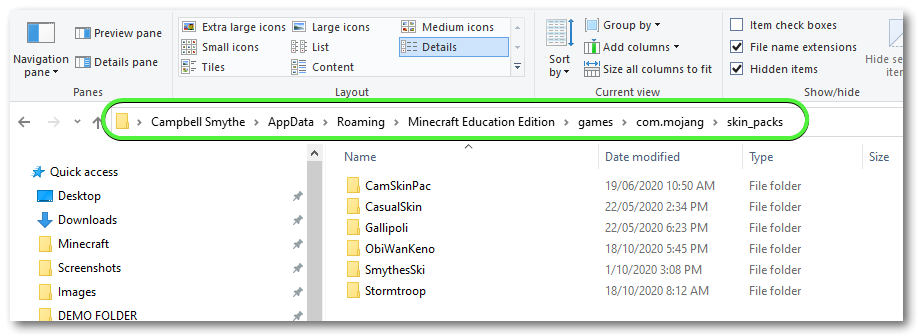
  1. Open File Explorer and click the View tab and select the Hidden Items box
    how to delete skins from Minecraft education edition

  2. Then in File Explorer click – Local Disk (C:) – Users – [your username] – AppData – Roaming – Minecraft Education Edition – games – com.mojang – skin_packs ( for example my location is – C:\Users\csmythe\AppData\Roaming\Minecraft Education Edition\games\com.mojang\skin_packs)how to delete skins from Minecraft education edition file explorer
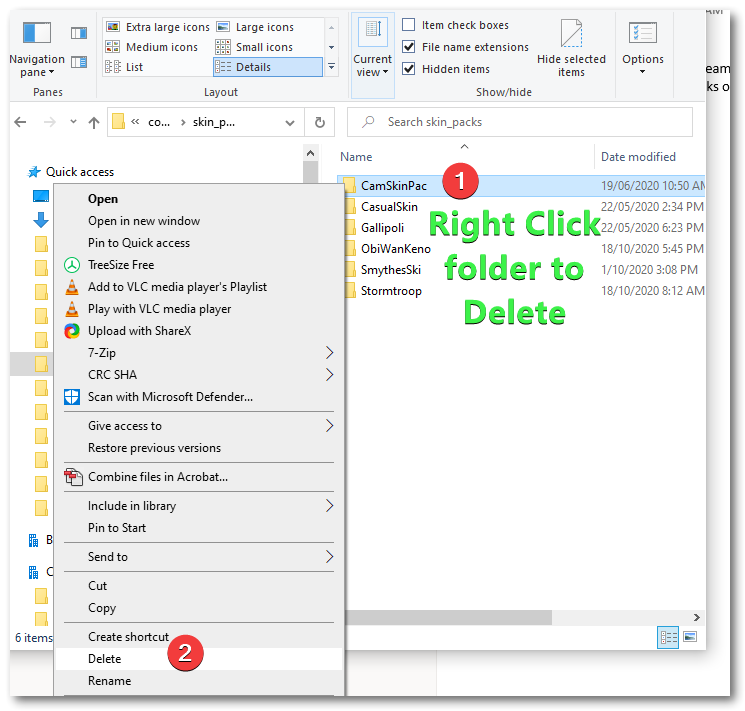
  3. Then simply right click the folder name for the Skin pack you want to Delete and Delete it, then Restart Minecraft Education Edition
    delete folder with skin pack minecraft education edition