OneDrive: Where to find those Files that were Shared with you

OneDrive: Where to find those Files that were Shared with you

Our staff are so much more familiar now with using OneDrive but some still search their emails to find the links to Shared Files and Folders.

With OneDrive you can sync files that have been shared with you to File Explorer in the same way that you can sync files from SharePoint and Microsoft Teams.

Here’s how.


Using your Web browser login to Microsoft OneDrive

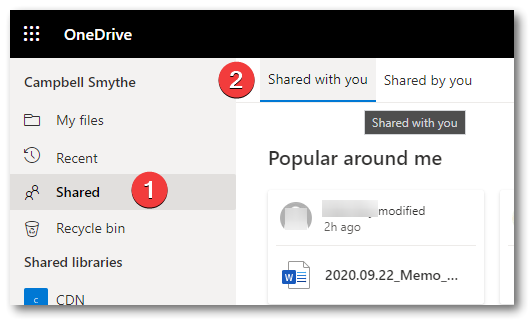
Click the Shared link, then Shared with You

OneDrive Shared with You

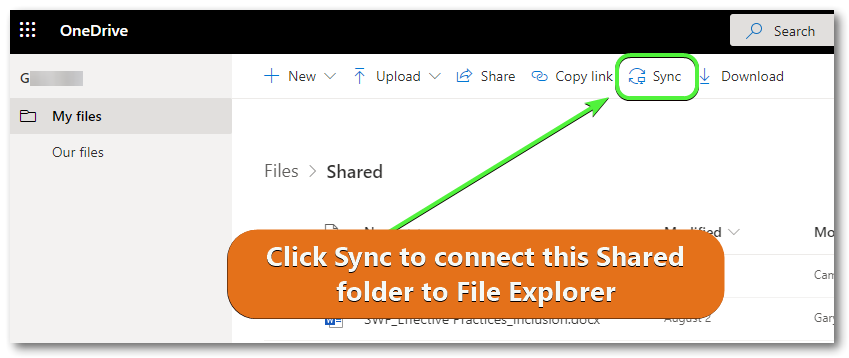
Double Click the Folder icon for the Folder of Shared Files you want to Sync in File Explorer (in my case the folder below is named “Shared”)

The Folder will open in a new browser tab and you will now see the Sync option on the Menu bar.

Click Sync and that Shared Folder will now be available in File Explorer (Win) or Finder (Mac).

OneDrive shared files sync file explorer

buy surface pro 7
Teams – Give a colleague Praise

Teams – Give a colleague Praise

Using the Praise cards in Microsoft Teams gives you an easy way to acknowledge a colleague’s work or just highlight who they are and something they’ve done.

The very fact that you know it’s available hopefully promotes more people to acknowledge others and build them up.  Praise cards are seen by members of the Team in which you are Posting it.

Here’s how to give Praise:

  1. Start by clicking he Praise icon beneath the Post box in Teams
  2. choose the type of Praise Card you are sending
  3. search for the Team member
  4. add a message to your card
  5. Preview and Send the Praise
Teams give Praise with Praise cards
Remote Learning from Erub Island, Great Barrier Reef

Remote Learning from Erub Island, Great Barrier Reef

Class Teams supporting Remote Students

St Augustine’s College Cairns is one of our schools working with SDS created Microsoft Class Teams. These Microsoft Teams are created and managed with a daily sync between the college’s student administration system and our Office 365 Tenant so that Microsoft Class Teams are created and managed for each timetabled class.

The SDS sync continues to manage the class from the timetable so if students or teachers move between classes their access to the correct Class Team continues.

Microsoft Class Teams provides the class (Teacher and Students) with a discussion section, shared (and Read only) file section, a Class Onenote notebook to distibute pages, an Assignments tool and also the ability to integrate other apps such as Flipgrid, SharePoint Portals, Wakelet and many others.

The other Teams features such as Chat, video meetings, video and audio calls are also able to be initiated by the teachers.

A new Insights tool also provides the Teacher only with a look at when the students are working on documents and how they are engaging in the Class Team Posts section and Assignment progress.

Here’s Cyril, a Year 7 student at St Augustine’s College Cairns engaged in remote learning from his home of Erub Island near the Great Barrier Reef in the Torres Strait.

This looks to be the best desk in the world to me right now!  I chatted with Cyril using Teams Chat today and his feedback on Teams – “it’s working and easy to use”.


Class OneNote – Best Practice Guide

Class OneNote – Best Practice Guide

Best Practice Guide – OneNote (Class Notebook)

The Class Notebook template in OneNote is a powerful collaborative tool that teachers can use with students to deliver and collaborate on class materials.

Each Student can access the Class notebook with a personal section (the teacher can also access) for taking their own class notes and completing tasks. Instead of handing out photocopies the teacher can distribute new notebook pages to each student.

OneNote is available for Windows, Mac, tablets and mobiles.  Microsoft’s main education support page can be found here
This is a guide on working well with OneNote Class notebook. During a time where online services are under such a heavy load it is important to educate the people using these online applications in best technical practise.

Use the correct OneNote Application

Download the latest version of the modern OneNote client application:

Keep OneNote active

Active relates to the application you are using.

  • Keep OneNote active / do not minimise OneNote – While the Notebook is syncing or content is being distributed, both students and teachers need to keep OneNote open and active until all content is synced.
  • Stay connected – The device that is using the Notebook needs to stay connected to the network while the sync process is occurring.
  • Simply close OneNote when finished – Do not close the Notebook within OneNote as this will force an initial sync the next time the Notebook is opened, simply close the OneNote application instead of opening and closing individual notebooks.

New Class Notebooks (and New Students)

  • Use the Notebook created in your Class Teams – If your school is using SDS created Class Teams then for each class timetabled in the school’s administration system a Class Team will be created. Use the Class Notebook created by the Class Team.
  • New students and teachers timetabled to a class will automatically be added to their relevant Class Team/s and the associated Notebooks. Note: If the Class Notebook is created by the Teacher – not SDS it:
      • will not automatically bring in new timetabled staff and students,
      • will not be stored in the correct location,
      • will be lost if the staff member who created it is no longer with your Education organisation.
      • ​​​​​​​will not be accessible by anyone else at the school unless that teacher has added them
  • One Notebook per class (~30 students) – Avoid adding multiple classes to a Class Notebook as increasing the number of students, increases the size of the notebook and its ability to sync in a timely manner.
  • Use the Teacher only section – By default the Teacher only section is not turned on for Class Notebooks. To turn this feature on go to the Class Notebook settings within Teams.
  • Content added in Teacher-only section is not seen by students or synced down to their devices.
  • Store course content here (following best practice for creating content) and then move it across to the Content and Collaboration sections as needed.
  • If course content is extensive, it removes the need for a significant initial sync on student devices.
      • Use the default student sections – teachers can create additional student sections or rename the default sections when initially setting up the notebook. However, please avoid creating section groups within student sections as this causes issue with the distribution of pages.
      • Allow time for an initial sync – A new Class Notebook will have all new sections and new students and therefore will need time to perform an initial sync.
      • Keep OneNote active – refer to the previous point.

Note: A new student to the class should allow enough time for the first initial sync to occur. This time will vary based on the size and number of notebooks that need to sync.


New Content section – requires a manual sync

Planning is key to improve optimal use of Class Notebooks, as new sections and large content are added it will take time for the Class Notebook to sync.

  • Plan ahead – plan the new content sections that need to be created.
  • Create new sections ahead of time – create new sections the day before.
  • Sync – When a new section is created the teacher should perform a manual sync to ensure the new section is available before class.
  • Students need to sync – If new sections have been created and synced by the teacher, please ask at the beginning of class for students to perform a manual sync.

Note: New Pages do not need a manual sync if they are created in an existing section and students have previously had a successful sync.

Content/Page creation (Creating content v linking or inserting)

Inserting/attaching/embedding large files such as PDF’s, word documents, videos etc will slow down the syncing process and distribution of content to students as this increases the size of the page and the Class Notebook as a whole.

  • Create page in an existing section – new sections take longer to sync, therefore for those times when you need to create content during a class, try to create the page in an existing section to reduce the sync times.
  • Choose the best way to add your content:

Within OneNote there are many acceptable ways to add content onto a OneNote page. However, some methods encourage a timelier ‘sync’ for your students.

  1. Create content directly on the page – type or copy and paste material directly into a Class Notebook page instead of embedding the file or linking to it.
  2. Embed Sway or stream video – Teachers can embed a Sway or stream video as the content lives elsewhere as only being linked.
  3. Link files instead – If you cannot create the content directly in a page, upload your file/s to the Class Site in Class Teams (or in a location that students can still access) before linking it to a OneNote page. Links can be used by adding a hyperlink to the file.
  4. Adding files as attachments in small numbers – Be aware of using your Class Notebook as file storage, this can lead to the Class Notebook becoming very large and can cause issues with syncing.
  5. Embed as a last resort – Avoid embedding large files – this includes PDFs, large or complicated Word documents with lots of images or tables etc as this typically increases the size of the page and therefore the Notebook which will slow the syncing and page distribution process down.

Distributing Pages

When a page is distributed to a student’s section, it takes a copy of the page and places it in the student’s section. This process electronically replicates photocopying a handout and giving a copy to each student.

Where possible, distribute pages ahead of time. This is especially important if the page to be distributed is heavy (includes images or attachments) and/or if the class size is larger than 25 students.

  • Plan ahead – distribute the page ahead of time where practical
  • Only distribute the content you need – Distribute the pages you need for the next lesson from your Content Library so that your students’ devices sync quickly.
  • Monitor the distribution progress – when the page has been distributed, monitor its progress using the distribution panel (do not close this panel until distribution indicates “Done”)

Distribute once

  • Do not distribute the same page multiple times – Attempting to distribute the same page again will create duplicate copies of the same page and cause confusion among students.
  • Do not ask the student to go and copy a page you have already distributed as it will result in multiple copies.

Troubleshooting the OneNote app

In all instances of troubleshooting OneNote for either the teacher or the student, please ensure OneNote is open and is not minimised, in other words keep OneNote active.

Use the Notebook Navigation pane to confirm if the Notebook is still syncing.​​​​​​​

Microsoft provide a number of troubleshooting tips here – Microsoft Onenote troubleshooting guide

New student not seeing content in OneNote app

      • Student – Allow the Class Notebook to perform a full initial sync – this will take time depending on the Class Notebook size.
      • Student – If after 5-10 mins the notebook has not synced or starting to display content, please restart the app.
      • Teacher – Perform a manual sync to see the newly created student’s notebook.

New teacher not seeing content in OneNote app

      • New Teacher – Allow the Class Notebook to perform a full initial sync – this will take time depending on the Class Notebook size and the number of students in the class.
      • New Teacher – If after 5-10 mins the notebook has not synced or starting to display content, please restart the app.


Cant Delete a Student Section from Class Notebook

  • Open the Class Notebook in the OneNote app
  • Sync the notebook – keep the app open until sync is complete
  • right click the student section to delete and choose delete
  • Sync the notebook – keep the app open until sync is complete
  • Distribute a Test Page to students – confirm the Deleted Student section doesnt return
  • Delete the Distributed Test page from student notebooks and sync notebook


No students can see the new section or page created in the content or collaboration sections?

      • Teacher – Open the Class Notebook online and confirm the content has synced up from the teacher’s device.
      • Teacher – If the content is not online, perform a manual sync.
      • Student – Once Teacher’s sync is complete, perform a manual sync.

Some students cannot see the new section or page in the content or collaboration sections?

      • Teacher – Has the sync or page distribution process completed on the Teachers device?
      • Student – Close OneNote and reopen.
      • Student – If student has not performed manual sync after teacher created a new section, please do so.
      • Student – check if the Class Notebook is syncing, if it is, let the sync continue.
      • Student – If the Class Notebook is not syncing, perform a manual sync.

Students cannot see the page I distributed to their section?

      • Teacher – confirm page distribution completed successfully (Do not redistribute as this will create a duplicate page).
      • Student – Close OneNote and reopen.
      • Student – check if the Class Notebook is syncing, if it is, let the sync continue. Page distribution should occur within 5 minutes of the process completing on the teacher’s device.
      • Student – If the Class Notebook is not syncing or content is not visible after a completed automatic sync, perform a manual sync.

Students see my distributed page twice

  • this issue occurs when the student has “saved” the page from the content or collaboration section or when
  • the Teacher has distributed the page twice.
  • The only way to resolve the duplicate pages is for the teacher to go into each student’s section and remove the duplicate page.

iPads – turn off Auto Sync Attachments

Turn off Auto Sync Attachments on your iPad by navigating to the Sync page in your OneNote settings. All text and ink content will still sync automatically, but OneNote pages with rich content like images and PDFs will wait to sync until you visit the page. After that, the page you visited will begin syncing automatically.

How to – Confirm app is syncing

  1. In the top left hand corner open the Notebook Navigation pane
  2. Check the Notebook name for the sync icon.

How to – Perform a Manual notebook Sync (Windows & MacOS)

  1. In the top left hand corner open the Notebook Navigation pane
  2. Right Click on the Notebook and click on ‘Sync’.
  3. Click on ‘Sync This Notebook’.

How to – Distribute Class Notebook page to all students in the class

  1. Before the class, open the Class Notebook you’d like to distribute from in OneNote.
  2. Select the page you want to distribute in your Notebook’s Content Library.
  3. Select the Class Notebook tab, then select Distribute Page.
  4. Choose the Notebook section you’d like the page copied to. For example: Class Notes. All students will get a copy of the page in their Notebook’s Class Notes section. Click on ‘Distribute’.
  5. Wait until it distributes the page.


Original Content – Brisbane Catholic Education

Microsoft Teams – Use a Status Message

Microsoft Teams – Use a Status Message

Setting a Status Message in Teams is a really easy way to update the people most likely to contact you during the day.  Your Status Message simply provides other staff with a bit more information. Maybe you’re working away, at a conference or inservice.  Maybe you’re available but can’t use you video and microphone.

You can set your Status Message to appear above the Compose Box when someone is messaging you in Chat or mentioning you in a Post.

Here’s how to set it up:

  1. Start by clicking your Profile Picture and click Set Status Message
  2. Type in your message
  3. Choose to Send your Status if someone messages you in Teams
  4. Set an Expiry Date for your Status Message

Your Status Message will also appear in the information popup when someone hovers their mouse pointer over your Profile Picture within Office 365